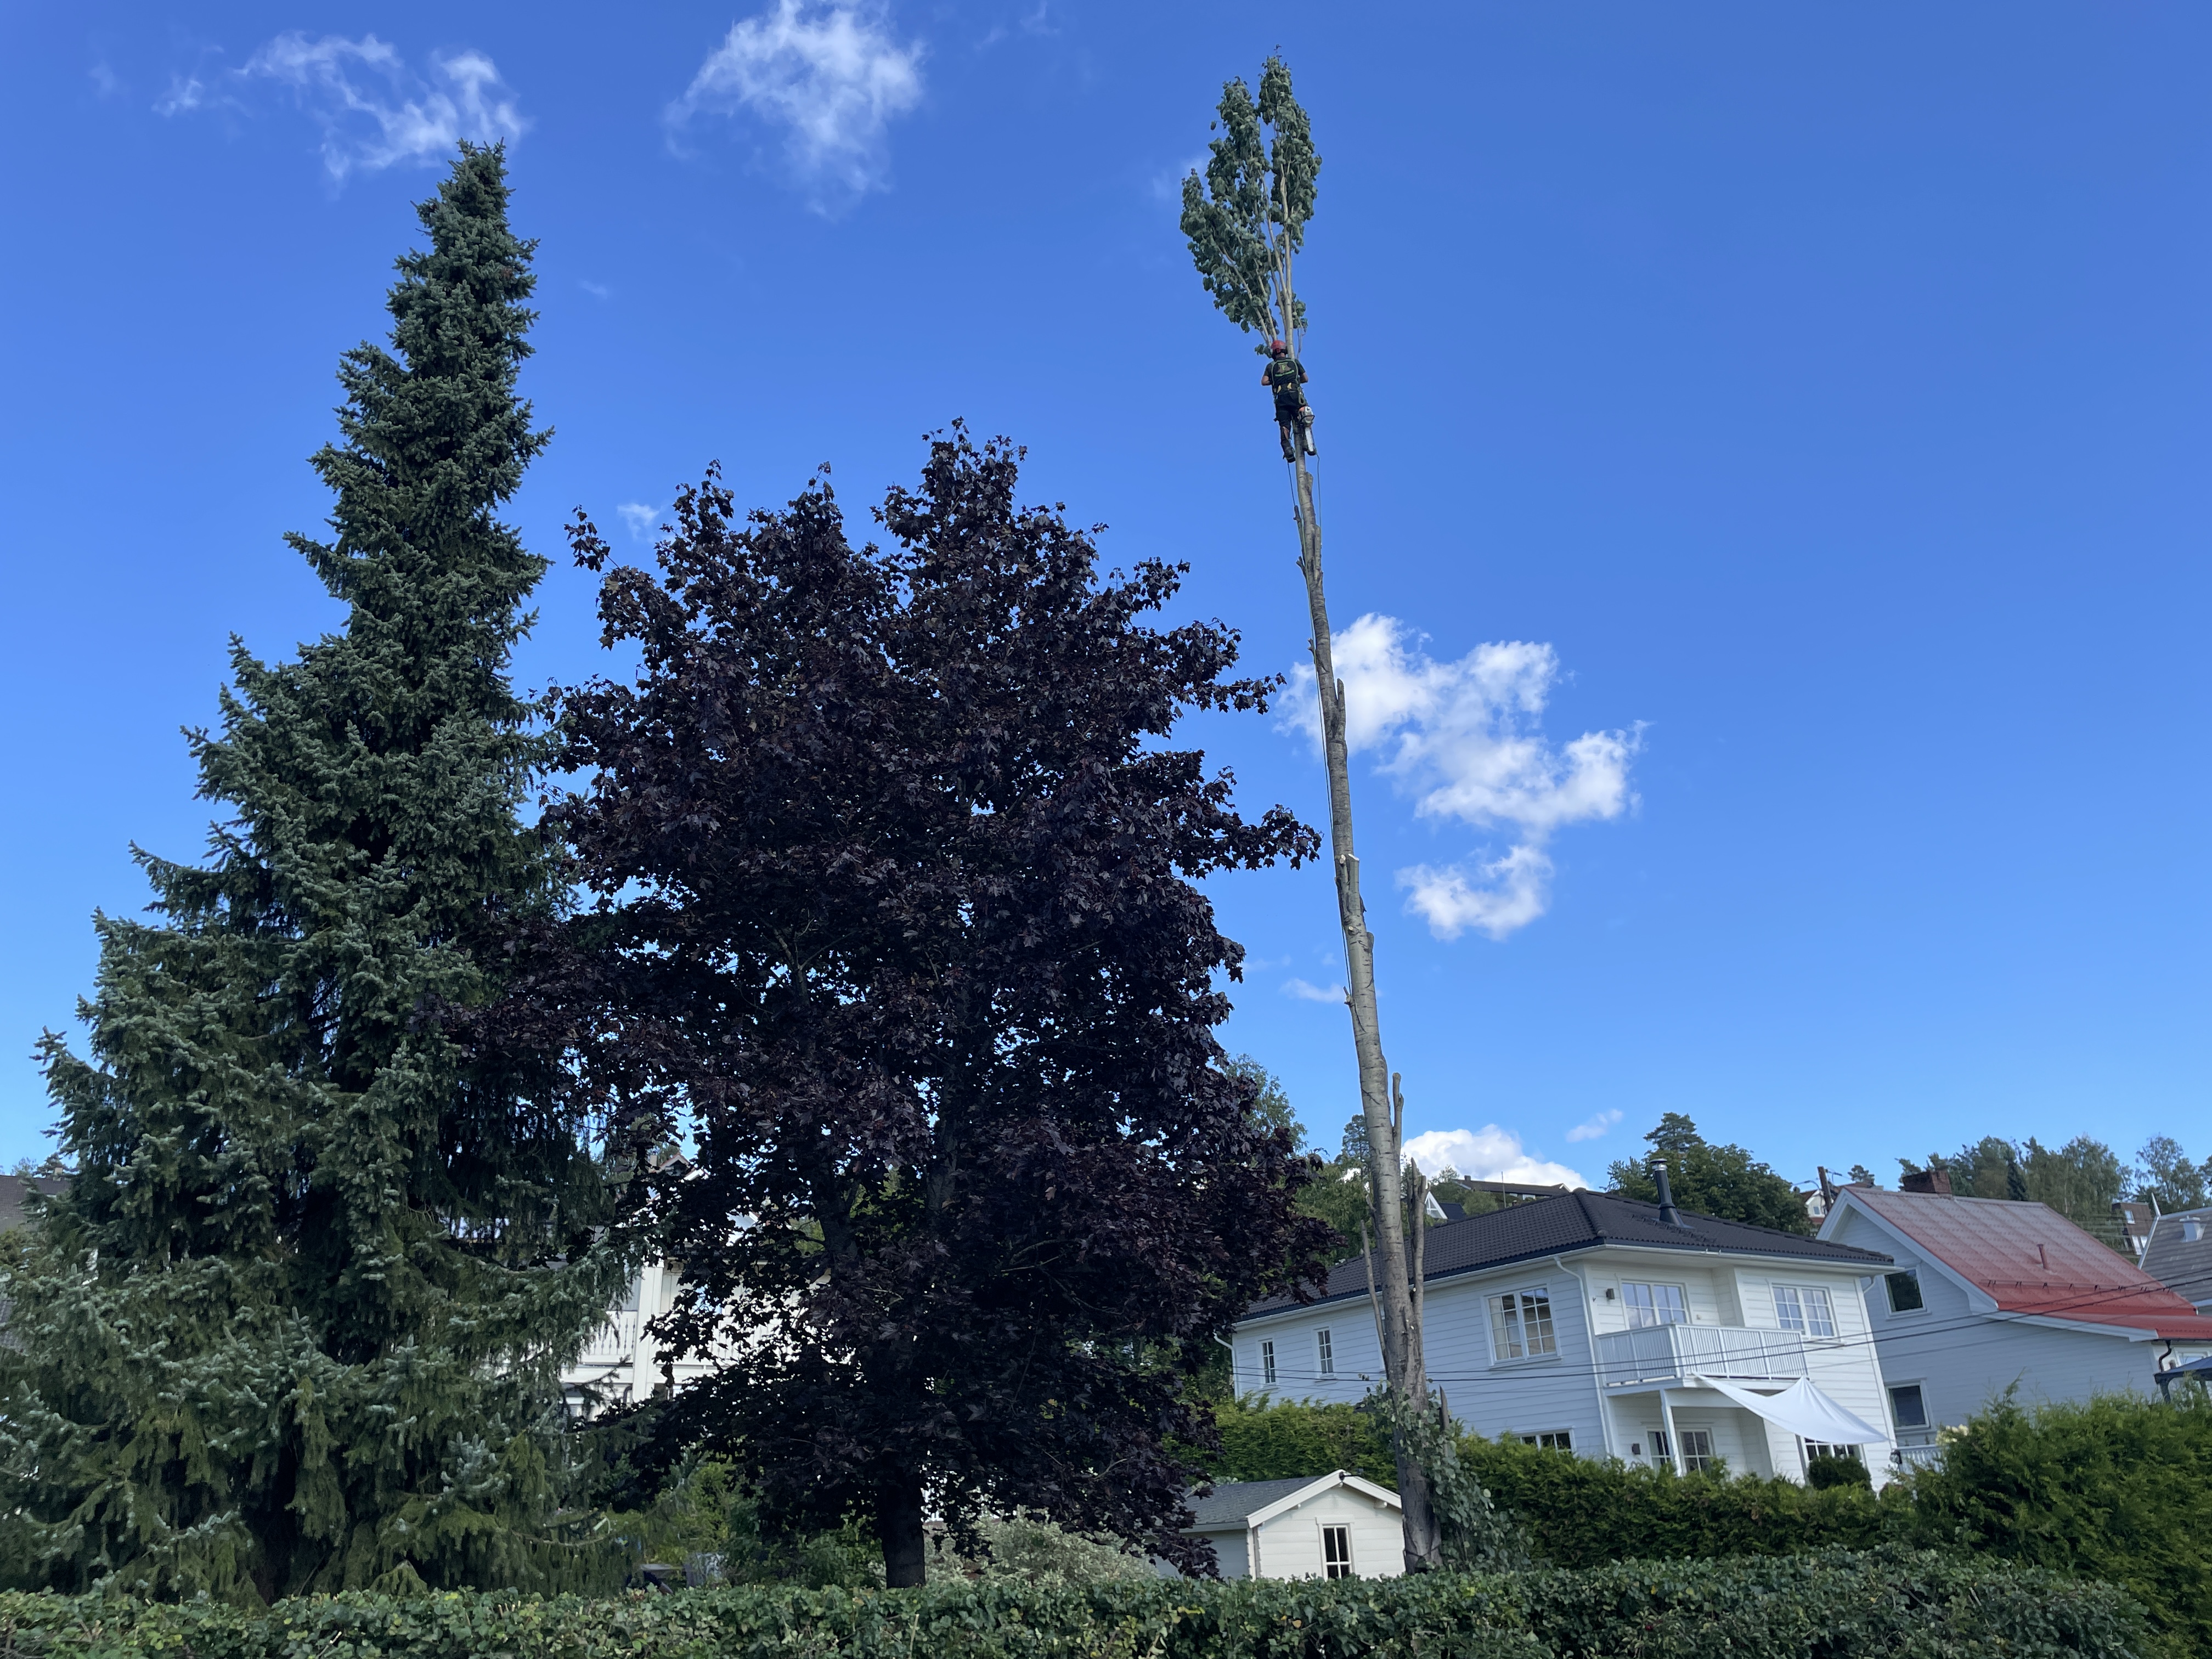
Det tok Lillestrøm Trefelling og Utemiljø AS en hel dag å fjerne et Piletre på over 15 meter i Hans Nielsen Hauges vei 42. Treet har stått der i over 30 år og var et kjent landemerke for alle beboere i området med sin karakteristiske tykke stamme og spisse grener.
Trefellingsfirmaet begynte å rote med forskjellen på diameter og omkrets. Huseier var mer direkte og sa :
“jeg får søke når vi er ferdig”
Ja, så sånn var det:
Er det altså fritt frem for enhver husier å be om tilgivelse for noe som er helt klart ikke tillatt, og får han det?
Er Lillestrøm Trefelling unnskylt for å ikke ha spurt om å få se godkjennelsen?
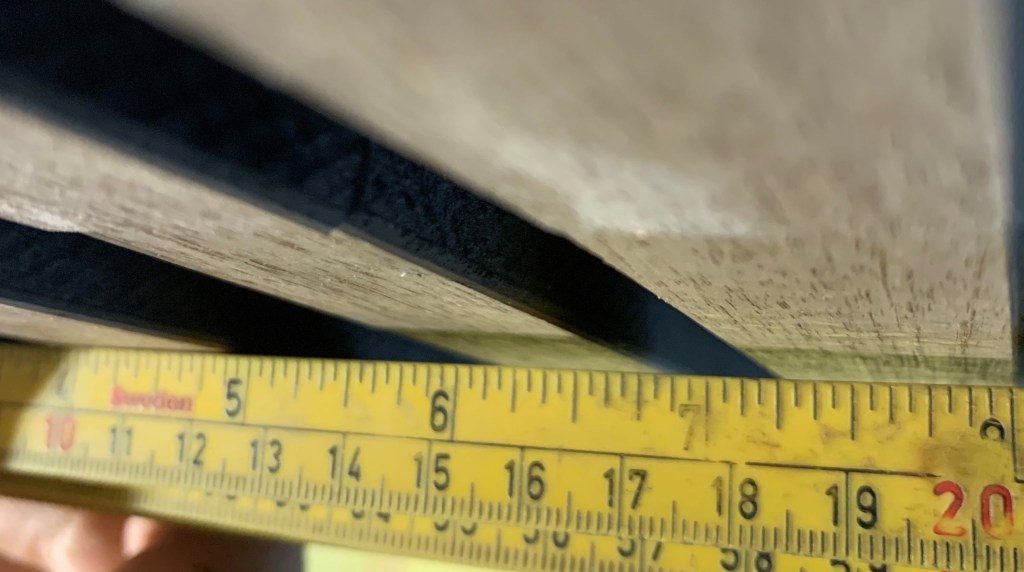
Reglen er ganske enkel å tolke, ta et målebånd og mål rundt stammen, er den tykkere enn 90cm så må du søke. Huseier prøve også å indikere at han bestemte over sin egen eiendom og Lillestrøm Trefelling siterte en huslov i farten. Noe som er totalt urelevant, men et forsøk på å ta saken i egne hender.
Hva skjer nå?
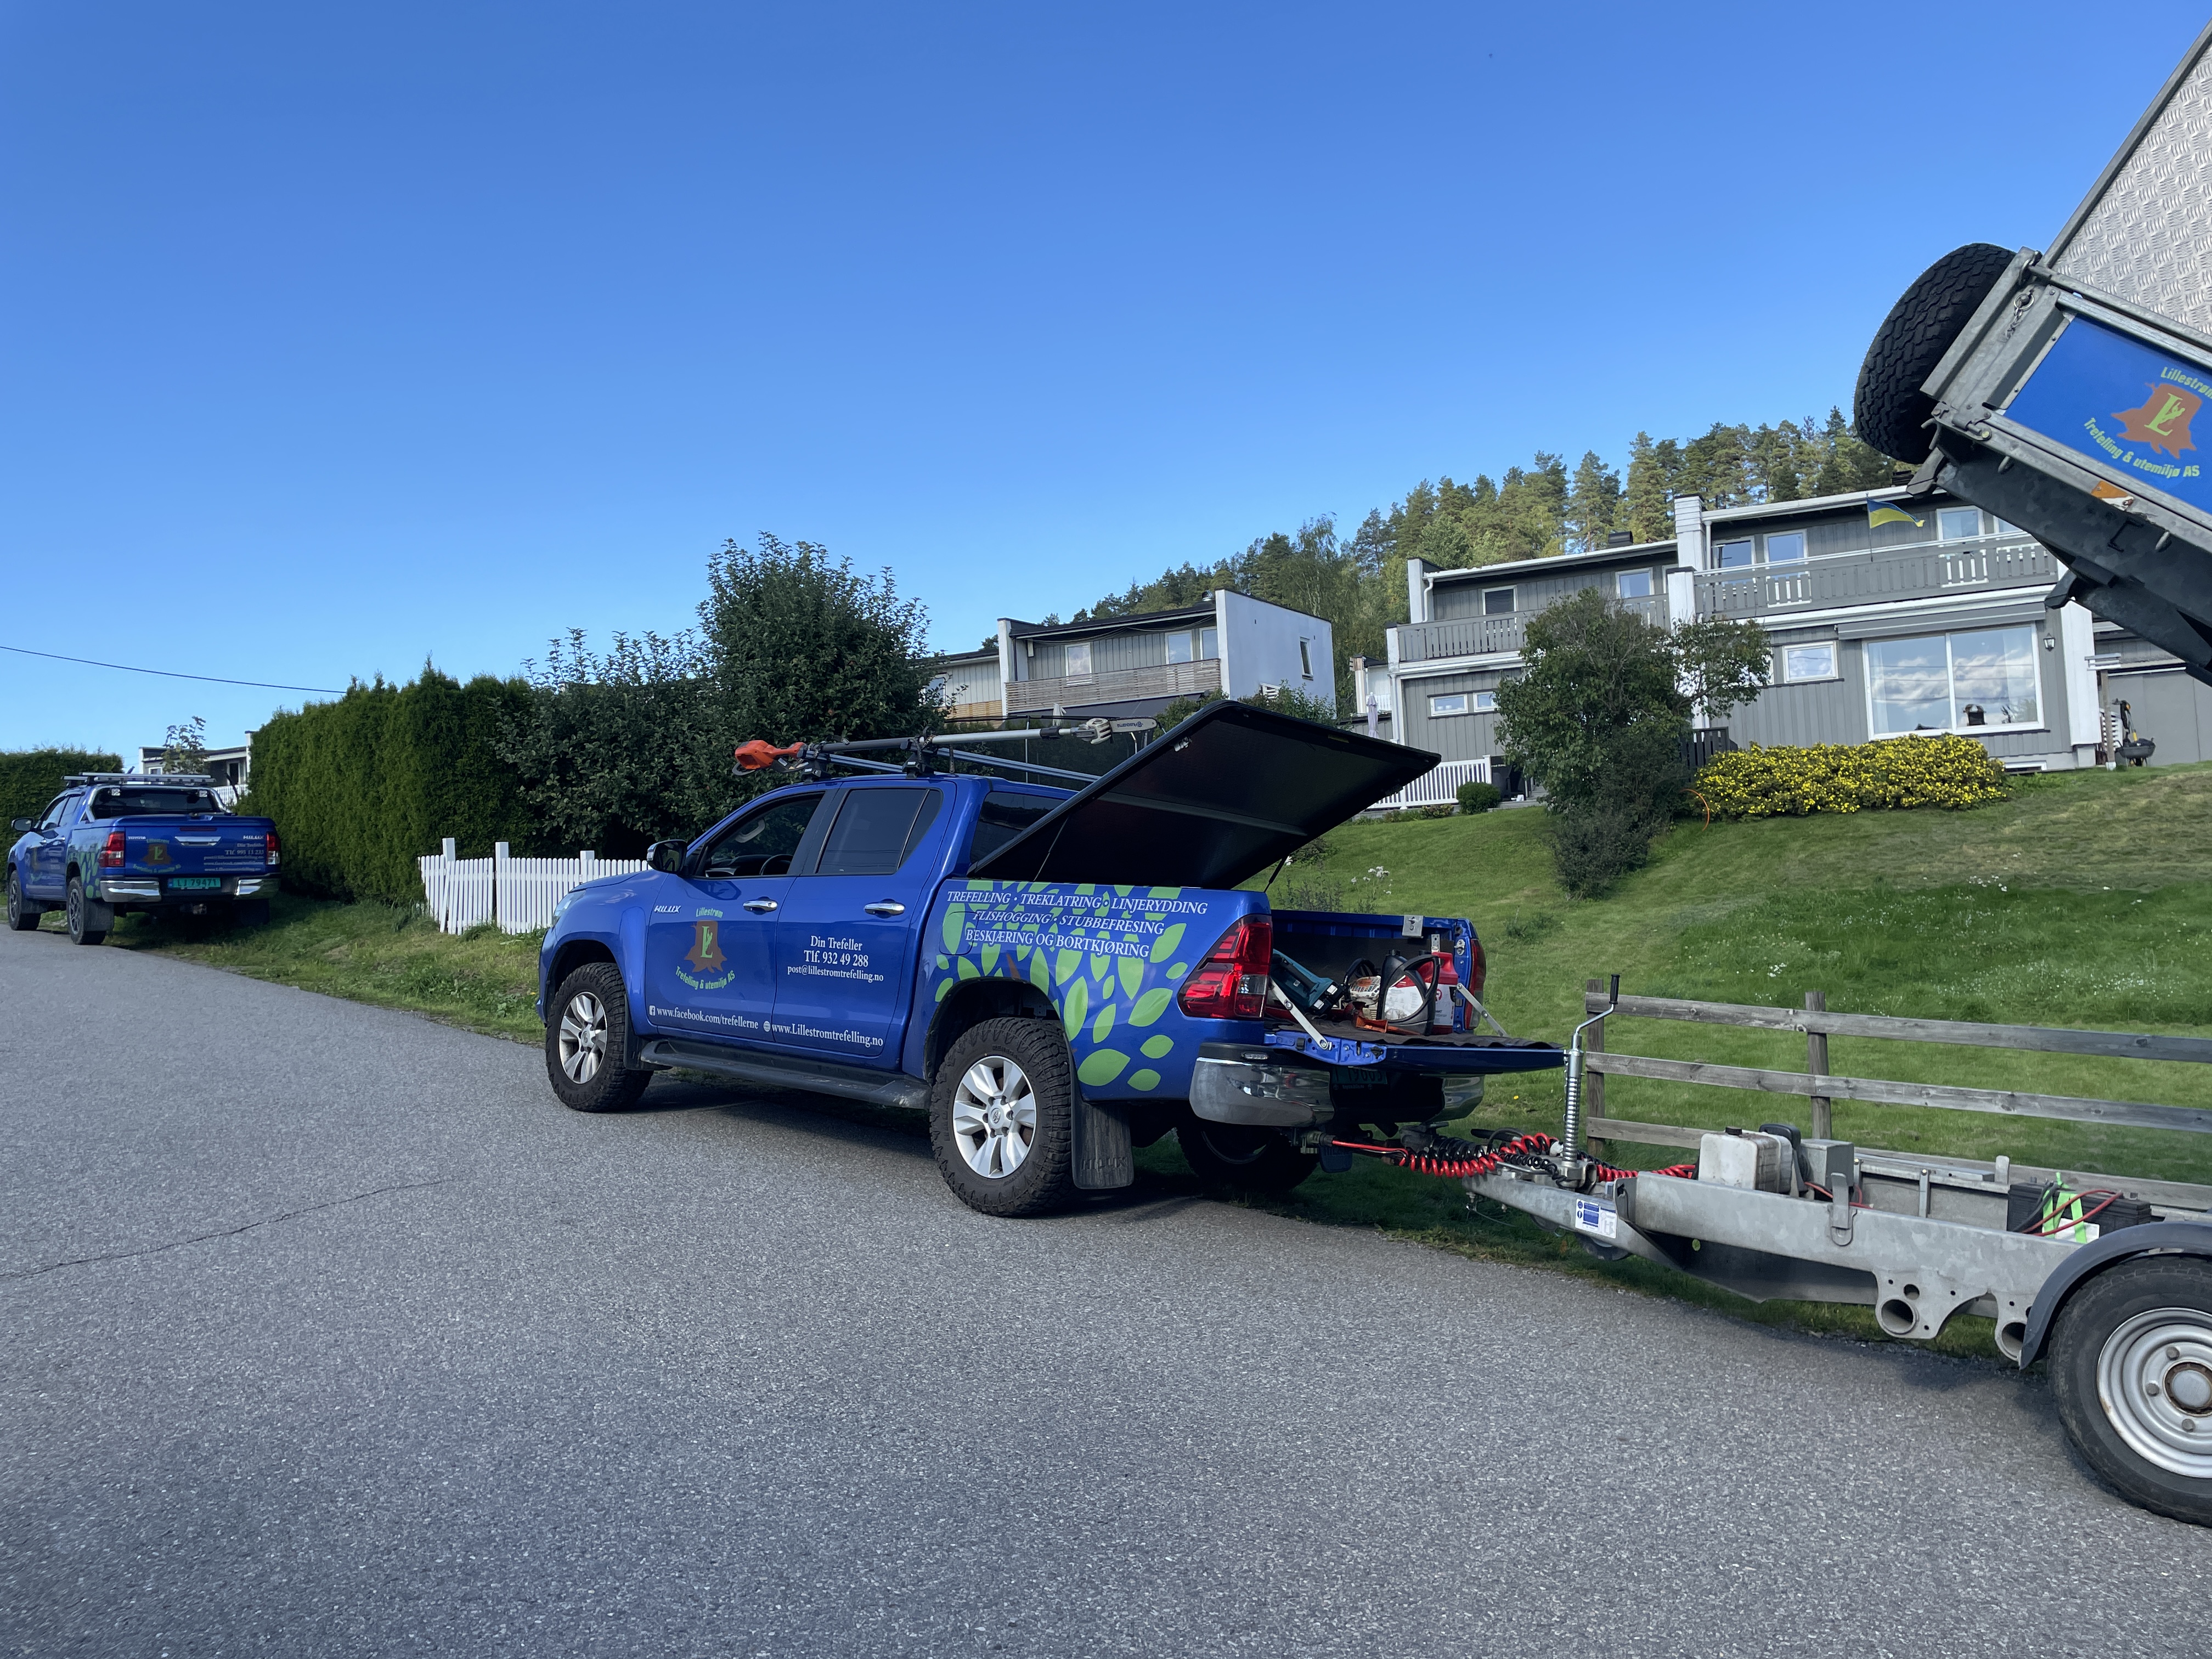
Dårlig erfaring med Lillestrøm Trefelling og Utemiljø AS, de kommer seg lett unna. Penger skal tjenes. Du sitter med ansvaret.
Jeg sendte epost til kommunen og det er nå opptil teknisk etat å vurdere om de vil gjøre noe i det heletatt. Sannsynligvis blir det med tilgivelse her også…
Dette var bare en trist dag for Hans Nielsen Hauges vei.
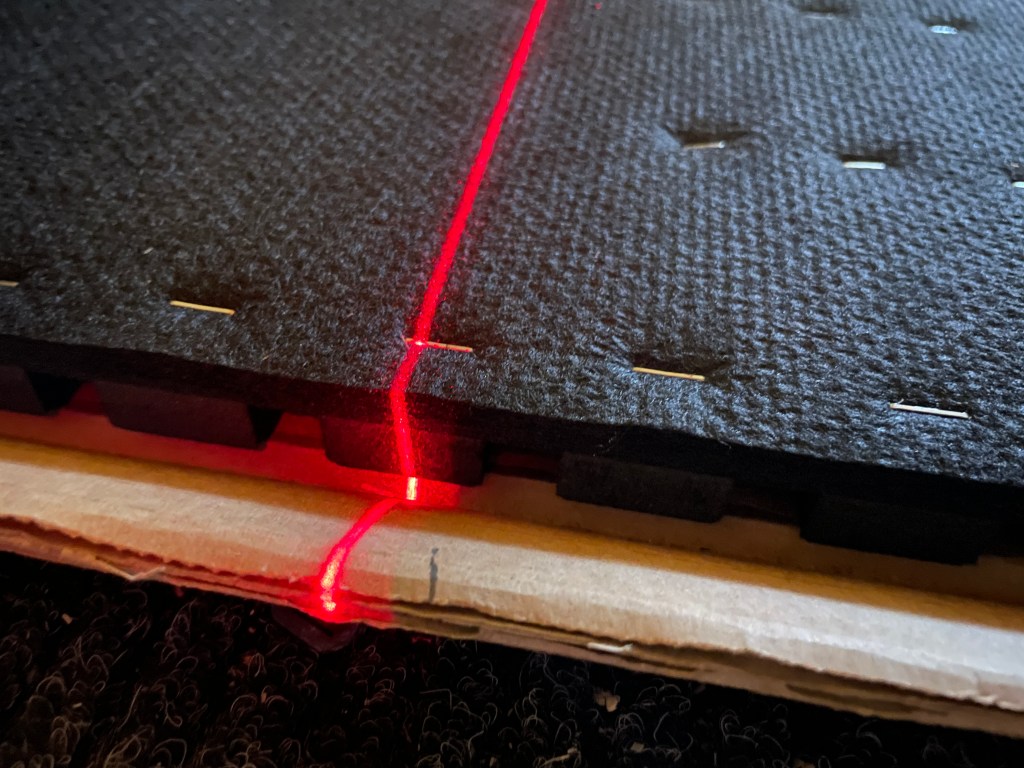
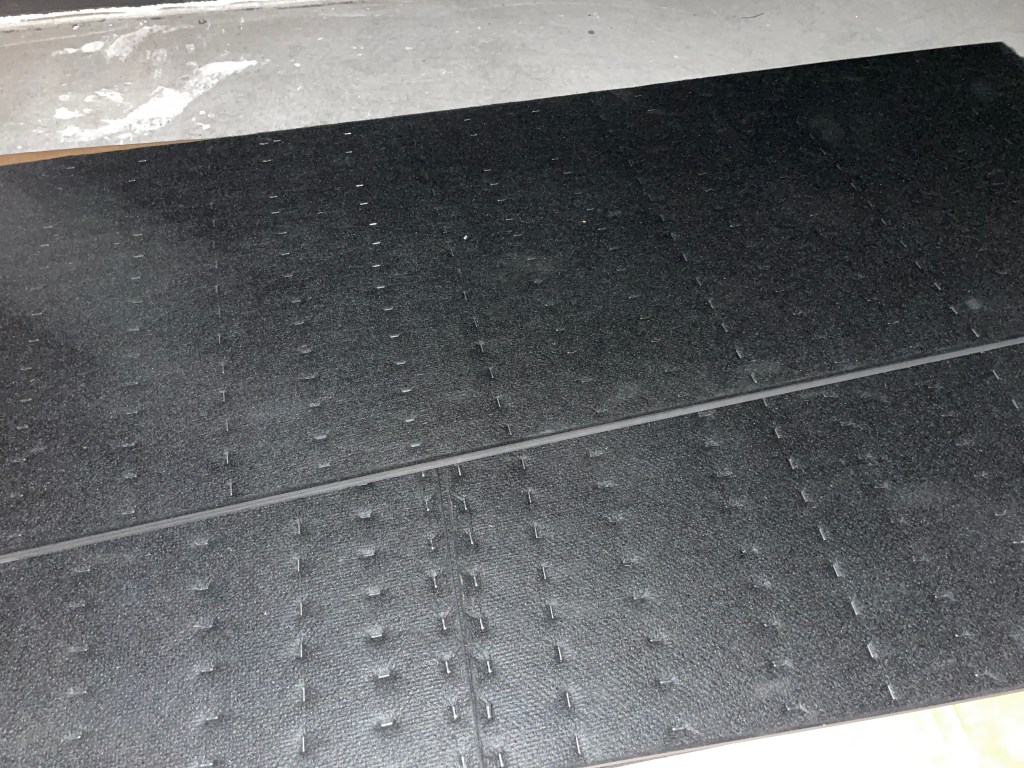
Her skal det bli fiskebensparkett! Jeg legger en gulvmatte med fuktsperre fra gulvhandelen, denne anbefales på det varmeste istedenfor de vanlige av plast og skum fordi:
Den er tyngre og legger seg derfor lettere riktig. (De av plast kommer lett ut av posisjon)
Den er lettere å kutte og gir rettere kutt.
Bedre støydemping
Negativt: Den alu-tapen som følger med er veldig flimsete og sårbar. Her kan du fint bruke bedre tape, men pass på at den ikke bygger mye opp.
Neste steg er parketten, men før du velger en fiskebensparkett tenk på dette, hvor mye tåler parketten?
Beste måten å finne ut dette på er å bestille en hel haug med prøver og ta skrapetesten:
Etter du har tatt skrapetesten er du kanskje nærmere farge og type, fordi det er tre typer parkett å velge mellom:
Tradisjonell tre-parkett
Parkett med komprimert trekjerne
Laminat med parkett look. (tenknisk ikke parkett)
Hvordan å fikse skraper på parkett
Det kan være veldig lett eller veldig vanskelig, avhengig av farge og hvor god du er til å blande voks. Med verktøyet under så kan du nemlig reparere nesten all type parkett med voks. Dog det skal MYE til for å matche fargen riktig. SUPERVIKTIG: Ta vare på en eller to planker fra prosjektet ditt som du kan øve på for å finne riktig farge før du starter å reparere gulvet.
Tradisjonell parkett:
Denne typen parkett er veldig høy og har et slipelag øverst for å slipe gulvet ved behov. Denne parketten er myk og tåler dårlig tunge møbler og skarpe gjenstander. Avhengig av farge og finish (olje, lakk, hardvoks) så kan riper synes godt. Sort parkett er veldig sårbar. Tradisjonell parkett er varm å gå på.
Laminat
Bygger ikke opp mye, tåler veldig godt skarpe og tunge ting, men fortsatt sårbar for skraping. Laminat er veldig kald å gå på.
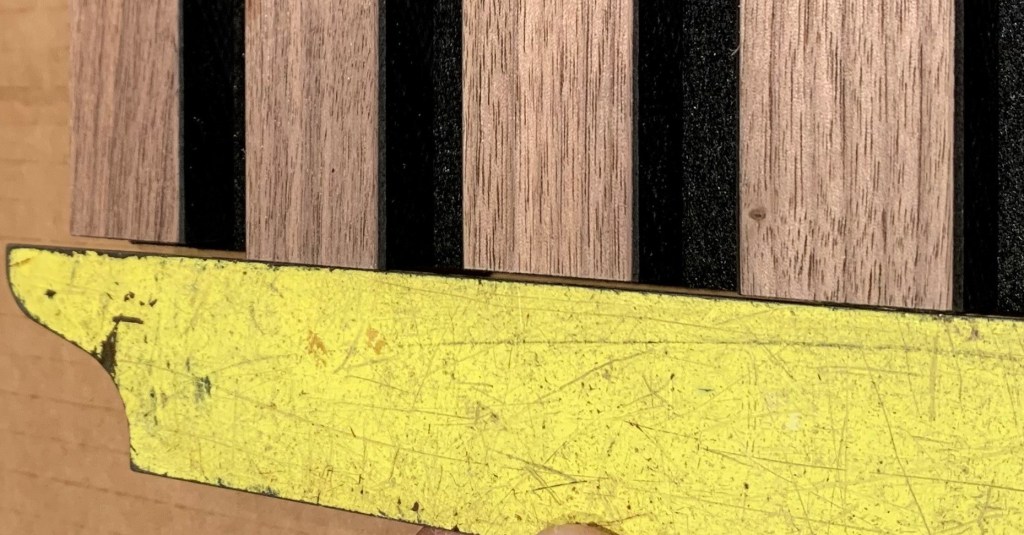
Kompakt HDF gulv med finér
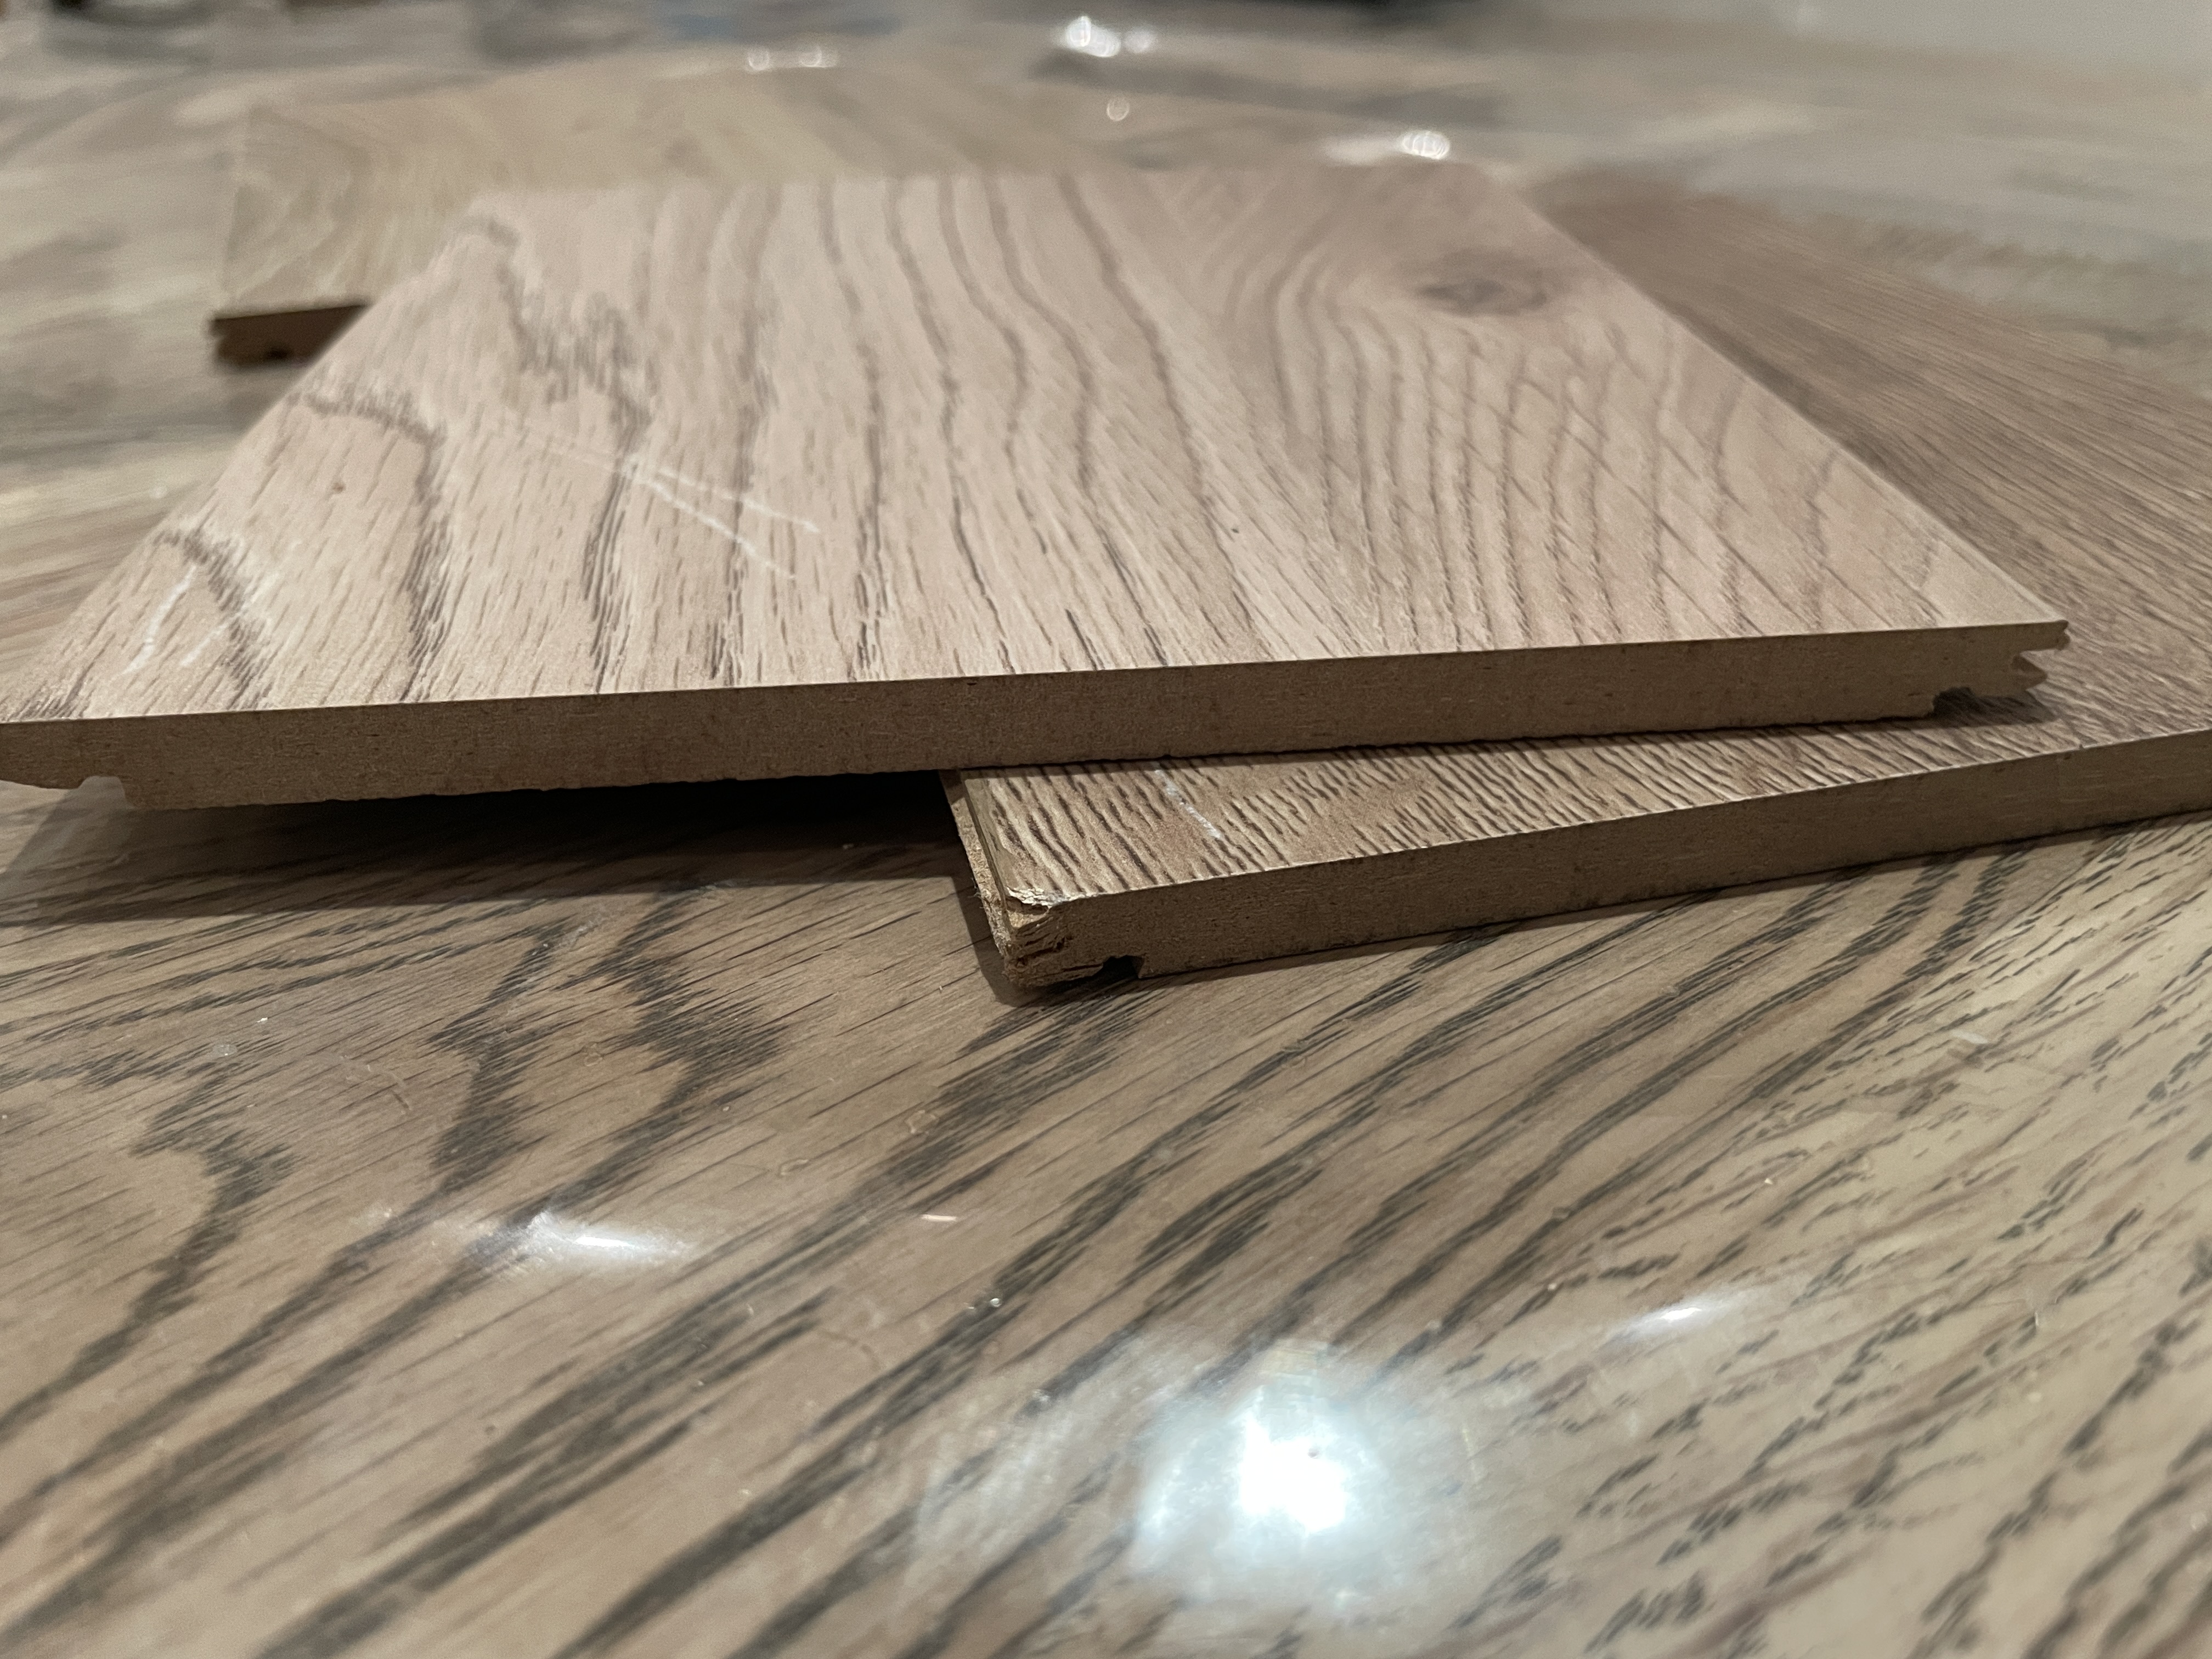
Det beste fra parkett og laminat. Komprimert tre i kjernen, en form for sagflis. Meget solid og tåler godt tunge møbler samt støt. Har et meget tynt slitelag av eikefinér som ikke kan slipes. Og slik du ser på bildet så med skraping og mørk trefarge så er skader synlige. MERK: Jeg har skrapet med MYE kraft for å få til disse ripene. Disse gulvene er varme å gå på og demper trinnlyd bra. De bygger ikke like mye opp som parkett, men mer enn laminat.
På mitt gulv så har jeg valgt kompakt HDF grunnet bestandigheten mot trykkskader. Gulvet er kjøpt hos Gulvhandelen og heter Greige Oak
Ferdig lagt gulv, bare lister mangler. Husk møbelknotter.
Dette gulvet er veldig lett å legge fordi det ikke er noen høyre og venstre side. Anbefaler at du kjøper med slagklossen for å ikke skade gulvet .
MEN
Her mine negative erfaringer med Gulvhandelen. Det er to store minus med Kompakte HDF gulv:
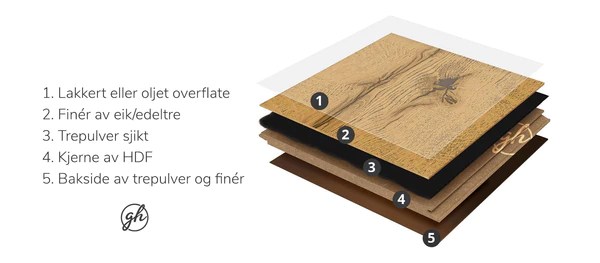
Problemet er at finér laget (delen som er ekte tre) er så tynn at det sorte laget indikert ved nummer 3 skinner igjennom.
2. Harde deler i trefinéren får en rar ujevnhet slik at det ser ut som gulvet er vannskadet.
Hadde jeg fått en prøve som så slik ut hadde jeg aldri kjøpt dette gulvet fra Gulvhandelen.
Etter samtale med gulvhandelen så forsikrer de meg om at dette er normalt og slik som det skal se ut. “Levende gulv” sa de. Jeg likte det ikke, men gulvet var i hus og skulle legges dagen etterpå. Dårlig situasjon. Dårlig finish.
Hva tenker du? Hadde du kjøpt gulv fra Gulvhandelen.no med slik finish?
Trodde det var en vandrehistorie, men nå skjedde det med meg. Du har kanskje hørt om leiebilselskaper som fakturerer for gamle skader. Plutselig var jeg over kort tid belastet over 20.000 kr for en Ikea leiebil til 399,- fra Hertz bilpool, (som drifter Ikea sine leiebiler).
Slik fungerer svindelen:
Hertz har noen helt sprøe vilkår hvor de tillater seg selv å fakturere deg uansett om man er skyldig eller ikke. De forsøker å overføre ansvar økonomisk for alle gamle feil og skader. Grunnlaget:
(…) kan vedkommende holdes ansvarlig for alle skader og mangler som er påført bilen innen den lånes. (…) For eventuelle skader oppstått forbeholder HB seg retten til å fakturere medlemmet innenfor rammene i denne avtalen. Medlemmet plikter å betale selv om det er tvist eller det er grunnlag for regress på tredjepart.
Hertz, som håndterer utleien for Ikea på https://www.hertzbilpool.no/ hevder at de har en sensor som registrerer kollisjon (Rent praktisk kan den kun registrere aksellerasjon, ikke faktisk sammenstøt).
Hertz har inspisert hele bilen og finner en eller annen tilfeldig skade som ikke er tidligere rapportert.
Du får ansvar for å betale denne skaden og kr. 12.000 er minstebeløpet, uansett.
Hertz kan fakturere mer, slik de gjorde hos meg. Fikk plutselig kr. 8000 mer belastet på kortet. Totalt over kr. 20.000,-
Hertz utleverer ikke de obligatoriske bildene som du har tatt ved å hente ut bilen, og de nekter å dele skademeldingsskjema, som man ikke har tilgang til uten å leie bilen på nytt.
Du må drive saken
Ergo, skjer det noe taper du. Har det skjedd noe før, taper du.
Hvorfor er dette en svindel?
Leiebilene har veldig mange skrammer, noen store men veldig mange små. Ikke alle synes på bilder. Det er betraktlig underrapportert skader og skrammer på bilene. Spesielt på innsiden.
Hertz deler ikke bilder som ble tatt av deg ved utsjekking av bilen, så du må faktisk ta dine egne bilder og film. Går noe galt med bildetakningen i skjemaet ved utsjekking, så har du kun et forsøk. Blir det uklart så er det synd for deg.
Hertz deler ikke skadeloggen fra bilen, der du kan sammenligne skadene som er meldt inn med det som faktisk er på bilen.
Hertz leter aktivt etter en skade for å fakturere, på denne måten så er alle urapporterte skrammer og riper en gullgruve.
Det er i Hertz sin interesse at folk ikke rapporterer inn små skader da disse kan man fakturere en annen leietaker og de tjener store penger.
Ser du skaden til 12.000 kr under?
Slik ser bildene ut når du må sjekke ut bilen. Ser du skaden? Hint, se på støtfangeren.
Ser du ikke skaden? Da er det noe galt med deg!
Merk også at de ikke deler bildene som blir tatt ved overtakelse og utsjekk av bilen. De skriver “leietaker” har ikke dokumentasjon før eller etter leien (det har Herz fått av deg via prosedyrene for utsjekk og innsjekk). De krever altså at man i tillegg må ha din egen video/foto.Ser du den nå? Tatt i knestående helt i bunn av fageren. Denne skrammen, typisk fra en fortauskant i lav hastighet.
Bråstopp på motorveien
Hertz påsto at sensoren ga utslag til et bestemt klokkeslett, det klokkeslettet kjørte vi på motorvei i følge Google Timeline. Her er fartsgrensen 90 km/h. En bråstopp her hadde vært katastrofalt. Så enten er det noe galt med sensoren eller så har vi bremset for kraftig pga. kø. I dette tilfellet var det ingen kø. Er dette en skrape man får ved å kræsje i 90km/h på motorvei?
Bråstopp her hadde vært farlig.
Dobbelfakturering og forsøk på å svindle til seg mer.
Det ble belastet kr. 12.000,- på kortet den ene dagen, og noen dager senere ble det lagt på over 8000kr i tillegg. Heldigvis så jeg dette raskt på kortet og fikk reklamert til korttleverandøren, Bank Norwegian. Her var Hertz raske med å “beklage” og si at beløpet på over 8000kr var en feil, men de hadde ikke oppdaget det om jeg ikke hadde klaget.
Man må være våken altså… Ikke stol på Hertz eller Ikea leiebil. Sjekk kortet etter leien.
Konzept K sine spiler ser jo utrolig stilig ut på både tak og vegg, samtidig som de demper støy og har kult design. Derfor bestemte vi oss for å modernisere soverommene og gjøre det om til to trendy rom hvor et av rommene senere kommer til å bli et kontor.
Planlegging av led lys
Lys på vegg og i tak
COB led strip så diodene ikke synes
Vi brukte mye tid på å rive ned og strippe alt av vegger og tak samt planlegge led lysskinner i taket. Dette skulle bli bra!
Men nei, det ble det ikke. Alle panelene fra Konzept K var skjeve og “slapp” når vi hang de opp i taket. Ingen av skjøtene var rette slik som på bildene fra Konzept K. Snekker anet ugler i mosen og det viser seg at alle platene måtte stiftes opp og kappes manuelt. Fabrikken kuttet ikke platene rett.
Så hvis du forventer en premium vare fra Konzept K så kan du bli grundlig lurt. Bildene gjenspeiler ikke virkeligheten og det går mye tid og penger med på å tilpasse varene de selger. Husk at du får samme type plater for Kr. 1495,- hos Byggmax
Takskjøt som henger eller er ujevn og man får en trappeeffekt
Sluttkanter med forskjellige lengder
Stiftene er ikke sentrert
Du må ha mange stifter
Noen plater har kant for å skjule filten, andre ikke.
Det er selvsag mulig å utbedre noe av dette og istedenfor å ta platene i retur så sendte Konzept-K en stiftepistol til oss og ba meg gjøre jobben selv for 200kr per plate, men kun for de platene som skal henge i taket. Det tar cirka 30 minutter per plate og stifte og renskjære.
Forøvrig så må alle platene stiftes bedre etter kutting da det ikke er stiftet tett nok til å bare skru rett opp på veggen. Det er 38 plater så dette tar tid. For 2590kr så hadde jeg forventet mer. Helt bak mål.
Personene bak foreldremestring.no er to helt vanlige foreldre med helt vanlige jobber innenfor helsesektoren. I tillegg til sine vanlige jobber så selger de kurs i det de kaller foreldremestring. De formidler også en form for gratis tips og budskap i pent designede bilder og plakater på sin facebook side.
Tipsene inkluderer en rekke feel-good tips og selvfølgeligheter sånn som alle foreldre kan være enige i.
Utfordringen er at de også prøver å formidle en form for ekspertise innenfor sitt felt og at de forfekter metoder uten noen vitenskapelig grunnlag for utsagnene. I skrivende øyeblikk er det heller ikke noen form for kilde eller referansebruk på de uttalelsene de står bak. Denne siden er full av tankefeil (Logical Fallacies) spesielt rettet rundt personlig erfaring og følelser
Dette er spesielt synlig når de forfekter en metode (Time-In) som ikke er vitenskapelig bevist. De går også så langt som å feiltolke alternativet for å få sin metode til å se bedre ut. Dette bryter mot grunnleggende vitenskapelig etikk.
Her er et eksempel hvor de potensielt gjør mer skade enn hjelp:
Metoden time-in som et alternativ til time-out. 1. De refererer ikke til noen vitenskaplige artikler 2. De signerer alle bildene med firmanavnet sitt 3. De får time-out til å se farlig/slemt ut 4. De veier ikke nøytralt opp alternativene
Fakta er:Time-out er en velprøvd metode som blant annet beskrevet her av selveste: Time Magazine og av CDC i USA – to ekstremt troverdige aktører.
Metoden Time-in har i følge George Holden ikke noe vitenskapelig hold enda.
“We’re currently doing research on whether time-ins work, but to my knowledge there’s virtually no evidence on whether time-ins are effective,” says George Holden, chair of the Department of Psychology at Southern Methodist University.
Vær ekstremt kritiske til disse to personene bak denne siden. De tjener penger på kursene, alt dere leser på siden er lagt ut for å få folk til å kjøpe kurs av dem. Det er en forretningsmodell som kynisk utnytter folk i en sårbar fase i livet. De er ikke eksperter, snarere tvert i mot da de viser ingen vitenskapelige egenskaper eller evner til kritisk tenkning på sine nettsider.
På internett har nå alle fått tilgang til en stor platform for å dele sin opplevelse eller mening om et annet selskap. Man kan også dele opplevelser og erfaringer. Siden mengden informasjon på nett vokser og vokser så er folk helt avhengig av vurderinger fra andre for å kunne vekte informasjon riktig. Derfor er det nå ekstremt viktig at folk deler sine erfaringer på f.eks Hotels.com Google Maps, Twitter, Yelp og TrustPilot og andre steder.
Så er det de personene som søker å kneble dette. Inn kommer Styreforman og Advokat Johan Haga, (som selvsagt er klaget inn til Norsk Advokatforening) etter han på oppdrag fra en bilforhandler forfølger negative kjøpsanmeldelser på nett. Her er essensen av personen som forsøker å manipulere informasjon ved å kneble ytringsfriheten. I kraft av sin jobb som advokat forsøker han å ødelegger rommet for offentlig debatt.
Skriver du en negativ anmeldelse kan du bli truet av en advokat med økonomiske represalier, selv om det ikke er noe hold i dette slik forliksrådet skriver her.
Hva er jussen som ligger bak truslene. Jo, det er boikottloven. Skriver du noe negativt uten å først lese deg opp på boikottloven så mener Advokat Haga at det er en ulovlig boikott.
Når var sist gang du leste lovdata før du ga 1 stjerne til et hotell? Merk at Haga kun går etter de som har laget dårlig anmeldelse, så hvis du ser kun gode anmeldelser, hvordan kan du da vite at de ikke har truet vekk alle dårlige?
Uansett, så er boikottloven noe helt annet og dersom du lurer så er dette en boikott:
Boikott på Haramsfjellet – Vindturbin
Så hvordan ser en trussel ut, jo: I et brev går Advokat Haga løs på anmeldelsen og krever at anmelder dømmes for sin frie ytring til å betale 20.000 kr og hans advokatsalær.
Noen kan argumentere at prisen en forhandler (Autonova) betaler for kunne drive handel i et demokratisk samfunn er at enkelte meninger og ytringer er ukomfortable. Det er her opptil Autonova å gi god kundeservice og det er opptil kundene å velge om de vil lese negative anmeldelser eller ikke.
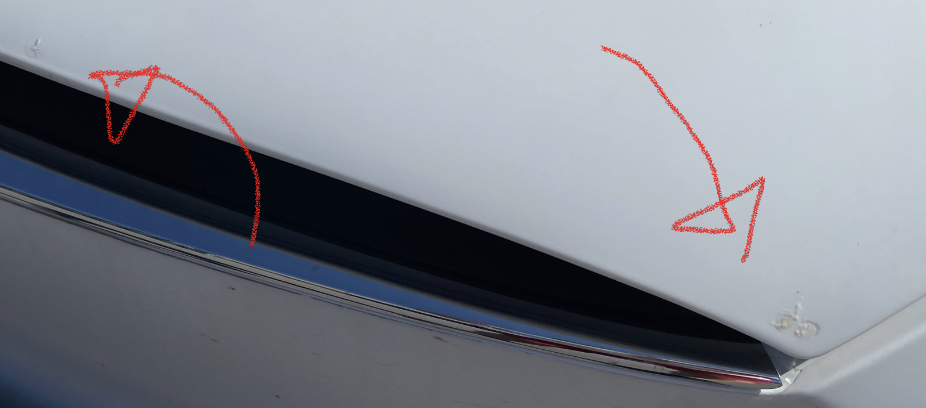
Every single time I bring my car in for rust or corrosion damage Tesla finds a way to claim rock impact. This borders on the absurd when they claim rock impact inside the doors and underneath the frunk. Also, rust is normal and if your car works, then shut up about it:
If the car can drive. No problem. It can rust all the way!
First of, yes the car rusts. Make sure you inspect the car often to undercover rust, Tesla might also claim that even though things rust, they still function, which is absurd. 4 year old car should not rust like this.
Rust
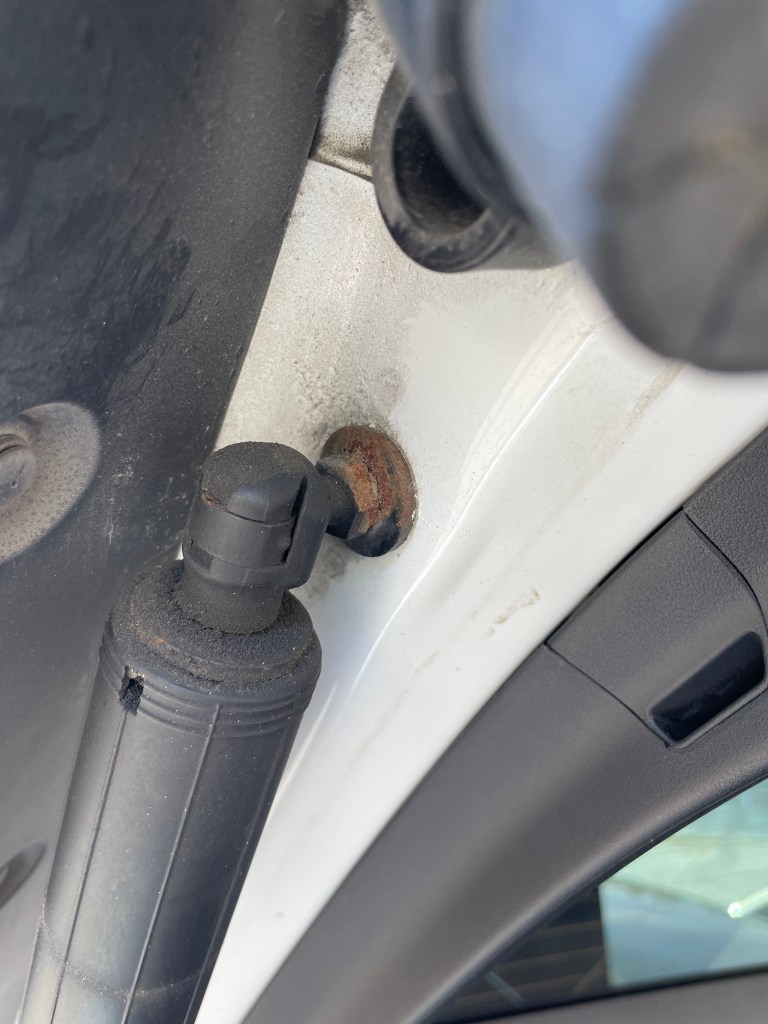
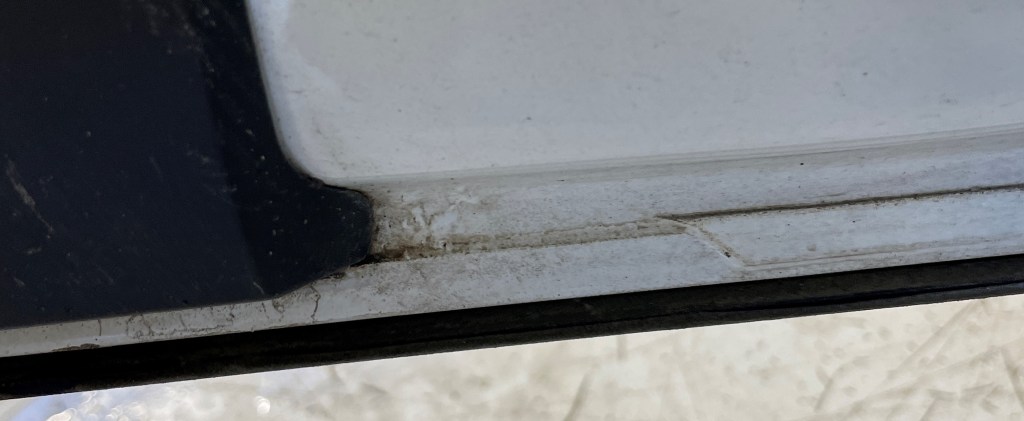
Corrosion
Here are some corrosion images, I have forgotten to take image of the spoiler. It has been replaced 3 times. They claimed rock impact for most of these. Including underneath the frunk and inside the door.
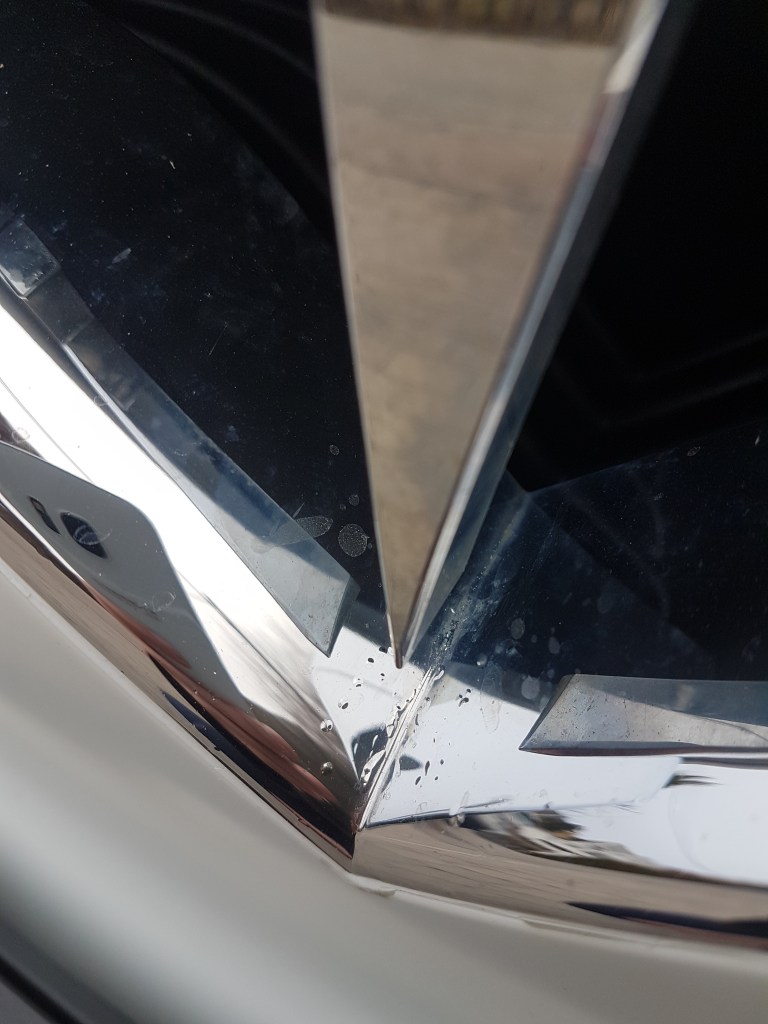
There is Hexis foil on the hood. rock impact claimed by Tesla!
Both pistons are corroding around the base. (Trunk)
Common place to corrode
Tesla just lies
So, how do you know Tesla plain out lies an claims rock impacts? Look at these two images of my front door. I took a picture some time before service, and during the service visit the technician touched the bubles and broke the paint surface. He pulled back and claimed rock impact! To make this even more absurd. This is INSIDE the door.
Before inspection
After inspection
Also Tesla does NOT understand Norwegian law about reklamasjon, so if your car has driven over 100.000 take pictues, get a NAF test and be prepared to take them to forliksrådet.
Bobler, dårlig instruksjoner, manglende utstyr og uherdete områder. Garasjepakken er bare lureri og du får ikke det du trenger med i pakken.
Etter å ha lest en del på nettsiden til EpoxyGrossisten samt sett de veiledningsvideoene der har lagt ut, så følte jeg meg trygg på at også jeg kunne oppnå et strålende resultat som vist på nettsiden deres. Kjøpte derfor deres “Garasjepakke” som tilsynelatende inneholdt alt jeg trengte.
Slik vist på EpoxyGrossisten sin nettside
“Garasjepakke” gone bad
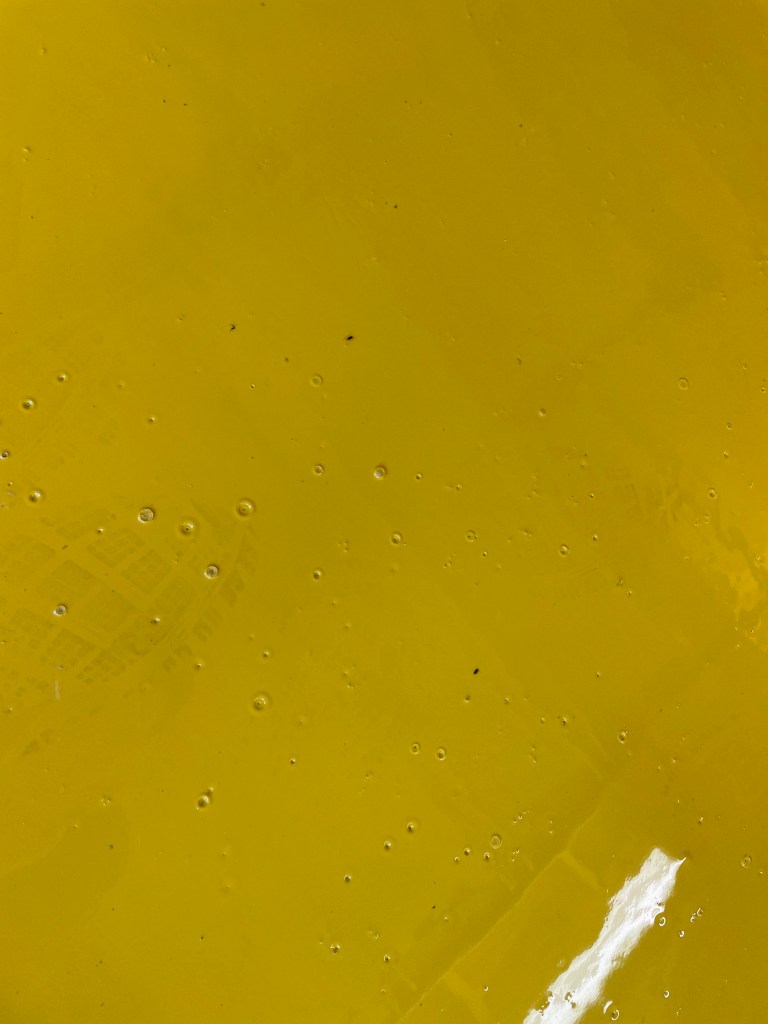
Slik ble det altså ikke. Jeg fulgte deres 1,47 minutter lange videoveiledning og startet arbeidet. Under påføringen av første strøk ante jeg at ugler i mosen da det ble mye bobler. Jeg var da nødt til å slipe ned 21m2 for å fjerne boblene før strøk nummer 2. For øvrig hadde jeg allerede sparklet og slipt gulvet for å fjerne alle sprekker i betongen.
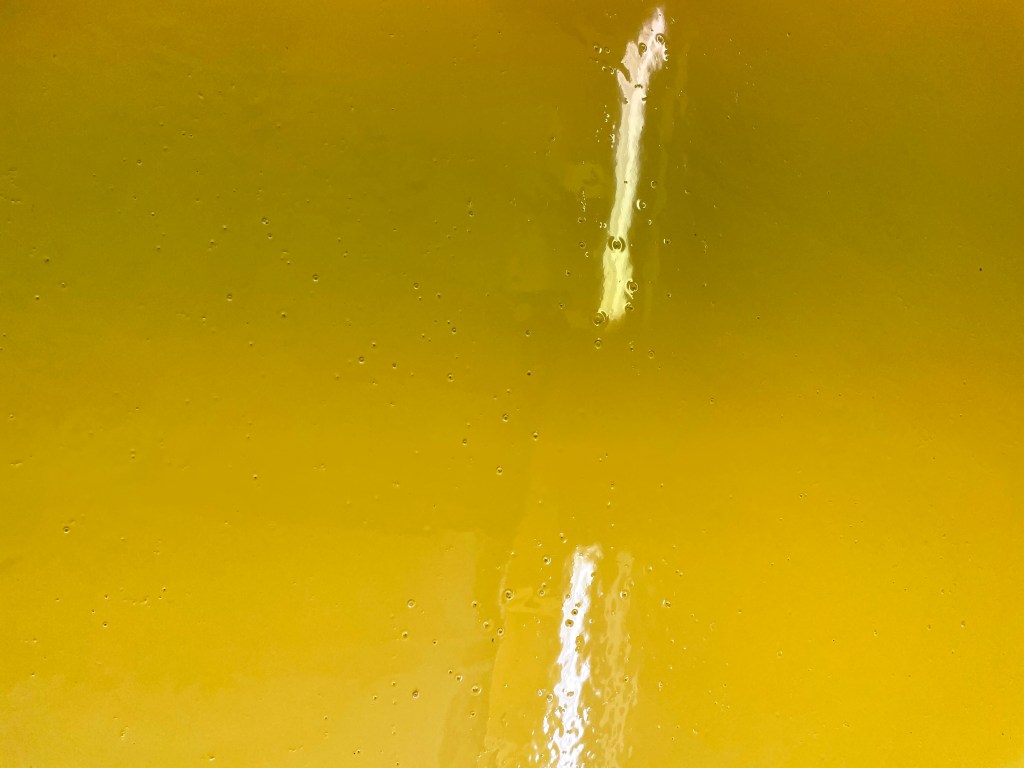
Denne gangen prøvde jeg å blande massen enda roligere så det ikke skulle komme så mange bobler. De hjalp ikke og strøk nummer to ble nesten verre en første strøk. Se selv under.
Slipt gulvet 3 ganger
Gulvet måtte på nytt slipes helt ned og jeg måtte starte å undersøke hvorfor disse boblene oppstår samt hvordan å forhindre dette. Det hjelper altså ikke å stole på at Epoxygrossisstenhar gode veiledninger og bra erfaring, her må jeg selv lese meg opp. Akkurat det jeg håpet å kunne slippe.
Trenger mer utstyr
Det viser seg at man trenger en piggrulle og piggsåler. Du må så gå rundt på området og rulle til alle boblene er borte etter at du har påført selve epoxyen med en egen rull.
Farlige råd
Epoxygrossissten har en video der de bruker Isopropanol (Blårens) for å fjerne bobler (samt piggsåler), dette må du ikke gjøre skriver de i en epost. Tydeligvis i den videoen så bruker de en annen type epoxy, selv om det ikke framkommer fra tittelen og at de også legger epoxy i garasje. Denne “misforståelsen” førte til at jeg fikk områder som ikke herdet i det heletatt.
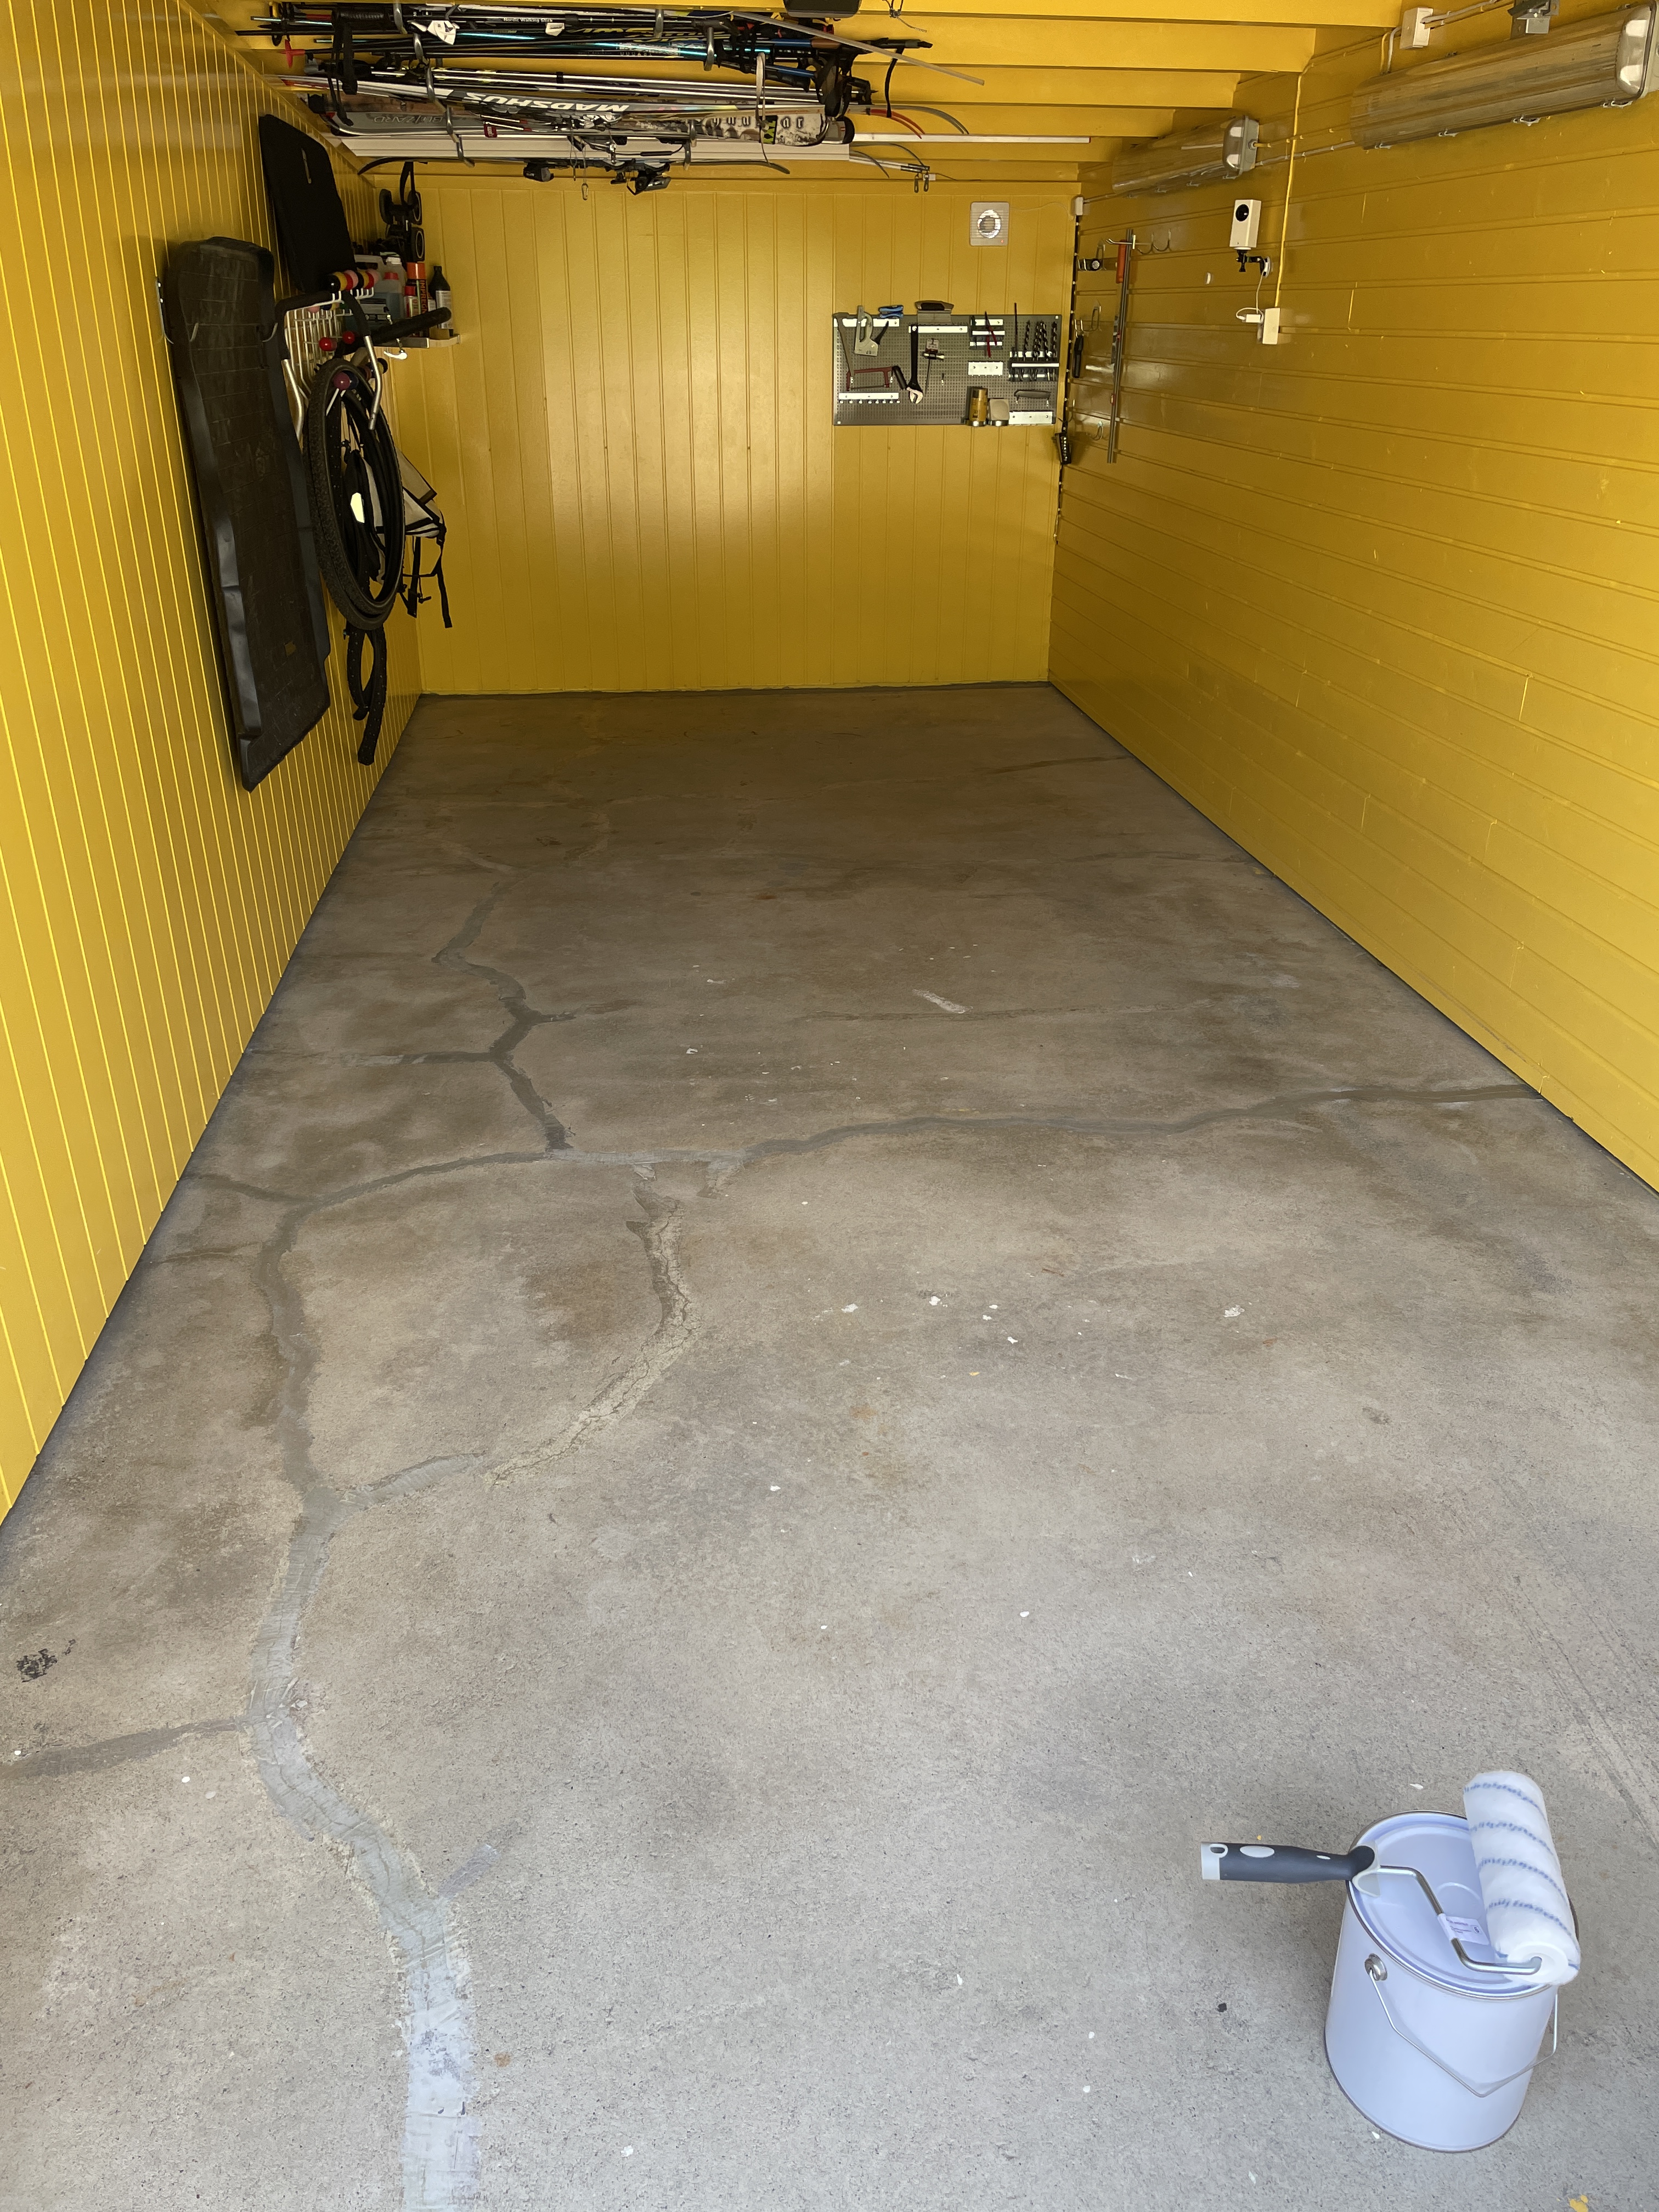
3 uker senere og garasjen er full av slipestøv og jeg venter nå på et nytt toppstrøk send i posten, typisk at de også var utsolgt på den fargen jeg brukte. Total fiasko, skulle ha benyttet meg av Maxbo sin epoxy istedenfor. Det ble bra ved første forsøk.
Resultatet
Det stod lenge mellom gul eller hvit betong. Hvit epoxy blir fort skitten og tar lett til seg misfarging, gul blir også fort skitten men holder på gulfargen og ser ikke så misfarget ut hvis du får vann på den. Selv om i utgangspunktet så tenkte jeg å ta hvit epoxy så landet det på en helt gul garasje. Gult er kult.
Du må betale 20.000 kroner og advokatsalær hvis du skriver så mye som én negativ anmeldelse!
Dette mente advokat Johan Haga som fikk i oppdrag av Autonova AS å slette min anmeldelse, blogginnlegg og twitter post. De klaget saken inn til forliksrådet.
Forliksrådet avviste saken og valgte å ikke behandle den. Det sier sitt.
Forliksrådet innstiller saken.
Historien: I 2018 hadde jeg en så dårlig kjøpsopplevelse hos Autonova at jeg valgte å bruke min ytringsfrihet til legge igjen én stjerne på Google, samt lage et blogginnlegg for å forklare hvorfor jeg valgte å gi én stjerne.
Det er vel i det offentliges interesse at negative opplevelser også blir delt?
Økonomiske trusler: To år senere oppdager daglig leder at kunder liker å undersøke de firmaene de vurderer å handle fra, han fikk spørsmål om de dårlige anmeldelsene som dukket opp på nett.
For å få slettet de negative hendelsene ringer daglig leder og tilbyr å kjøpe seg ut av situasjonen for først 3000 kr, for så økte til 6000 kr. Det ble tydelig understreket i samtalen at dersom jeg ikke aksepterte pengene så ville han ta rettslige skritt.
Det viser seg at bilforhandleren ikke takler kritikk på nett.
De sender foretaks advokat og styreformann ved Document.no Johan Haga etter den to år gamle anmeldelsen.
Advokat Haga fra Lov1.no, sammenligner en negativ anmeldelse med en boikott, noe som er ofte brukt for å hindre folk fysisk tilgang til en bedrift. Siste store boikott var da biler sperret Haramsfjellet for anleggsmaskiner som skulle bygge vindturbiner.
Synes du som leser at dette er to sider av samme sak, er en negativ anmeldelse automatisk en boikott?
Tømme kritikerens økonomi: Noen selskaper trakasserer sine kritikere ved å tvinge dem til å bruke tid og penger til å forsvare seg i retten eller i forliksråd. Dette handler ikke om rettferdighet, men å kue de som ikke er enige og fjerne kritikk. De gjør dette ved å true eller forsøke å tømme offeret sin økonomi.
I dette tilfellet har selskapet selv har invitert offentligheten til å kommentere på nett, men det er tydelig at negative kommentarer vil de ikke ha.
Hva er riktig av meg som forbruker å gjøre? Jeg brukte bare min ytringsfrihet på nett til å si min mening og nå blir jeg forfulgt og truet med bøter. Skal jeg ta i mot pengene som tilbudt av daglig leder eller holde stand?
Rett til en offentlige debatt: De færreste skriver en negativ anmeldelse med tanke om økonomisk vinning. Jeg ville dele min opplevelse med andre og takker pent nei til tilbudet.
Anmeldelsen er et relevant innspill i en offentlig debatt om selskapet. Det er min solidariske plikt til å dele kjøpsopplevelser så folk kan ta informerte valg. Jeg er heller ikke den eneste som har delt en dårlig opplevelse hos Autonova på Lørenskog. Hele 14 andre personer har gitt én stjene på Google.
(…) Mfl. § 7 jf. § 6 forbyr næringsdrivende å gi uriktige opplysninger om varer og tjenester som markedsføres. At alt som det opplyses om i markedsføringen skal være korrekt, bør være et velkjent og selvsagt krav for alle næringsdrivende (…)
Historisk presidens fra USA: Bøllete advokater som truer forbrukere, er ikke noe nytt og har foregått lenge i USA. Derfor har delstatene laget egne lover som beskytter forbrukere som, ikke har penger til å leie inn dyre advokater. Kravene som fremmes av Advokat Haga beskrives i USA som SLAPP og har som formål å:
(…)SLAPPS are intended to intimidate those who disagree with them or their activities by draining the target’s financial resources.
I USA gir Anti SLAPP lover anmelderen muligheten til å be en dommer om å forkaste saken. I delstaten Illinois heter Anti-SLAPP loven Citizen Participation Act. (ilga.gov)
(…)The information, reports, opinions, claims, arguments, and other expressions provided by citizens are vital to effective law enforcement, the operation of government, the making of public policy and decisions, and the continuation of representative democracy.(…)
Stor takhøyde: I Norge har vi vært lite berørt av dette, noe som kan tyde på at takhøyden er stor. For eksempel så gikk den populære bloggeren Sofie Elise gikk ut og oppmanet til: “IKKE KJØP DISSE PÅSKEEGGENE!”
Dette skapte problemer for Freia sin reklamekampanje og de valgte å ta en pause, dette må utvilsomt ha fått økonomiske konsekvenser. Sofie Elise ble aldri forfulgt for sin negative bloggpost og hun oppmanet til faktisk boikott.
Kursing og opplæring trengs: Det er ikke helt håpløst, de fleste selskaper har gode rutiner for å håndtere kritikk på nett. Dessverre er det noen dårlige egg som blir desperate når kundene utveksler erfaringer utenfor deres kontroll.
Ytringsfrihet på nett (Grunnlovens paragraf 100) og muligheten for å kunne si sin mening uten å bli forfulgt er hjørnesteinen i et demokrati og det innebærer at man blir eksponert for ytringer som kan være ubehagelige. Dette er prisen forhandleren betaler for å gjøre butikk og tjene penger i et kapitalistisk og demokratisk samfunn.
Uheldigvis ser jeg at når økonomiske tap ligger for spill så kaster advokat og styreformann Haga ytringsfrihet og kundeservice ut døren. Her gjelder det få penger! Ingen må få vite at Autonova av og til gjør en dårlig jobb!


You must be logged in to post a comment.