Here is a comparison chart between a range of Windows 10 Based Education devices.
All devices are running Windows 10 1607.
They have recently been wiped and waited for windows update to remove all flags in device management
Running on battery with more than 60% charge
Devices are joined to Intune from OOBE
Tests ran 3 times on each device (score is had minor deviations)
The devices range from Pentium to Celeron CPU and from 64 gig to 256 gig SSD. Ram is 4 gig. The results on each device differ marginally each time i run the benchmarking tool.
These devices are all really cheap and start at 1800 NOK before VAT.
Chart (In progress*):
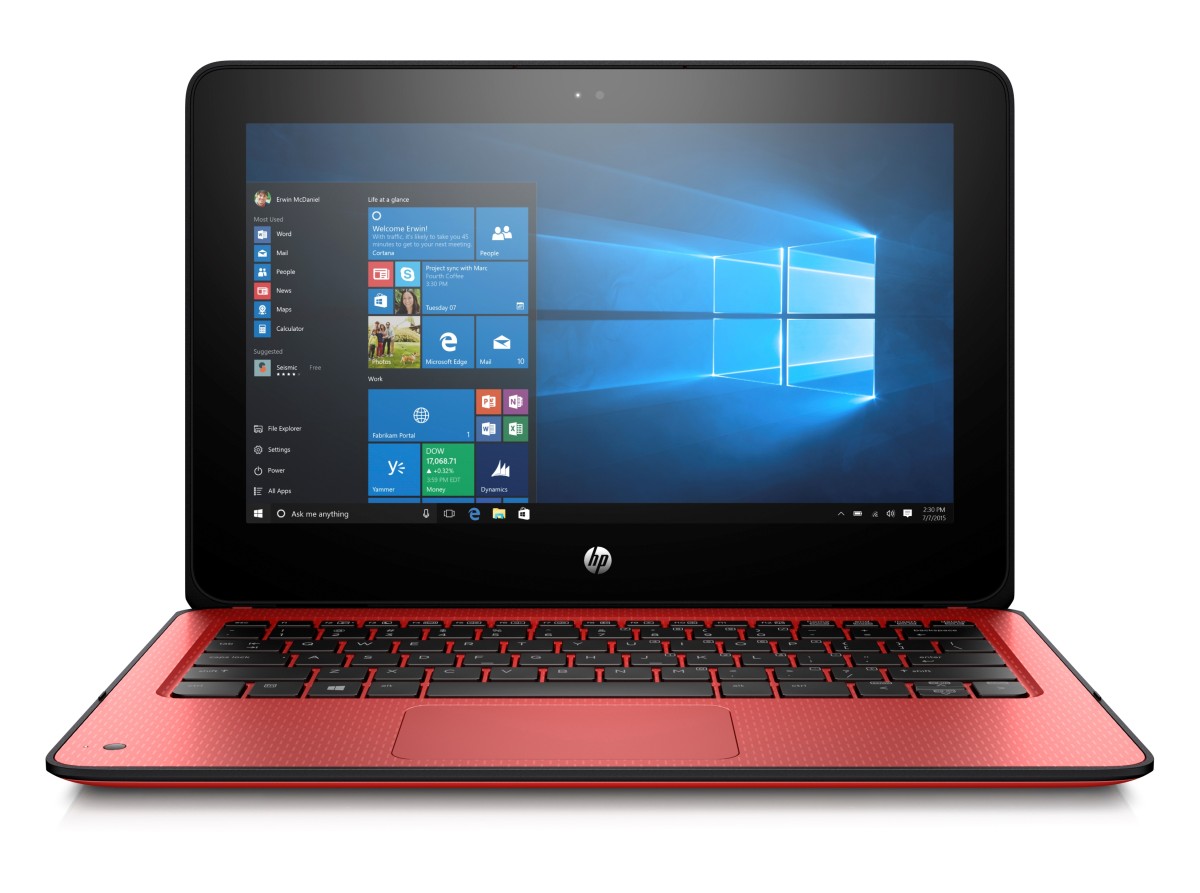
HP X360
Lenovo N23
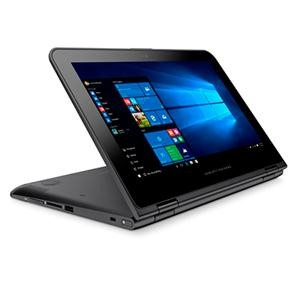
Acer B1 Spin
Lenovo Yoga 11E
HP Stream 11
Dell Latitude 3189
AS SSD Score
180
1607
153
673
Novabench Score
370
479
333
534
Max price NOK incl. VAT
4081
4081
3500
Not agreed
2500
Not agreed
Specs
Intel Celeron – 4/64
Intel Celeron 4/64
Intel Celeron 4/64
Intel Celeron N3450 – 4/128
Intel Celeron N3060 – 4/64
Intel Pentium N4200 – 4/128
What can you learn from this chart? There are difference performance, so having an opinion of what is good enough can save you some extra money when selecting a device. Will the user notice a difference, mabye… or mabye not.
Just keep in mind that a student does not need a super fast disk to write essay’s in word. But he will appreciate the extra power of a better CPU when having a Skype call and editing power point at the same time.
My opinion is that disk speed is the most important aspect of the devices. Even Celeron is good enough.
The need to protect your identity becomes more and more apparent as theft and crime takes to the web.
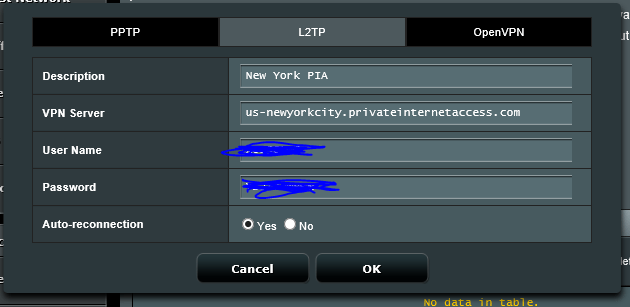
I have decided to set my entire home network behind a VPN not just individual units but all of the units connected.
Only way to do this is to have a Router with a VPN client installed. The ASUS RT-N66U “Dark Knight” Router has this.
EDIT: You have to update to the latest firmware from ASUS to get the VPN Client.
Before you go:
Pros:
1. Identity Protection (People cant see where you are from)
2. Content enablement (Browse US content on Netflix)
Cons:
1.Ads and websites can’t detect your correct country and thus you will be taken each time to the wrong site (e.g. english version of Google, not Norwegian)
2. You can not access local content unless you manually switch VPN (e.g. watch NRK nett-TV)
3. Pages that try to locate you or maps services will put you abroad
4. Accounts and Services will believe that you are in somewhere else.
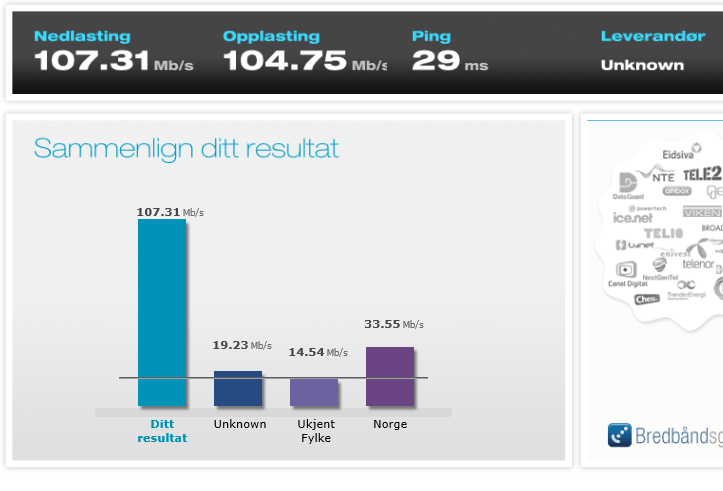
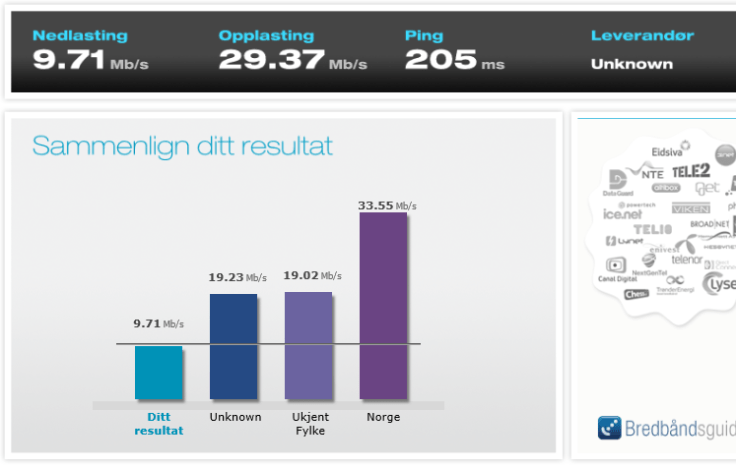
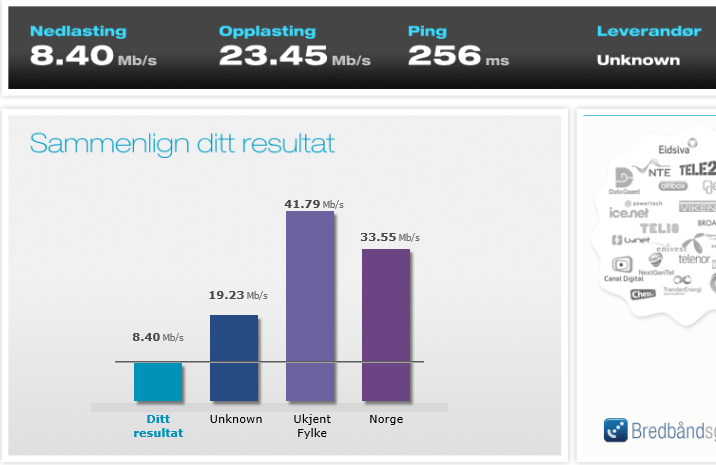
5. Speed speed speed, all will be slower.
1. Find 2. Save Locally 3. Create a folder in Visual Studio 4. Import into Visual Studio 5. Put Picture in objects
—FINDING PICTURES— Just bing them
—SAVE LOCALLY— Your Pictures need to be saved in a temporary folder and this folder has no Connection to the App
—CREATE FOLDER IN VISUAL STUDIO— Notice the folder structure in this App. ALWAYS put folders in the Assets folder (makes it easier) Right click on Assets to create more folders.
—IMPORT INTO VISUAL STUDIO— Single Click on the folder you want the picture to be in (here i clicked on Assets) Then Drag and Drop the picture from your folder to the folder in Visual Studio.
—PUT PICTURE ON OBJECTS— Click on SplitPage.xaml to load the designer Click the Object you want to fill with a picture (Here i clicked on the background):
Now, in the properties windows select BRUSH and Click the IMAGE BUTTON (you might have to resize the right bar to see the image source button)
Click on the ImageSource arrow down
Your picture is now visible and it should cover the entire background of the app. notice that once you dragged the image into the assets folder in Visual Studio, you also move the image file to a different folder on the disk. You may delete the orginal picture in your temporary folder.
This is how you create Your Split Page app by just replacing code.
1. Run Visual Studio – New Project
2. Select C# (does not really matter, you will not write code anyhow)
3. Give your app a name
4. Click Ok
Now you have actually created all that is needed for the app in terms of code. If you press run, the app will start. Remember, never mess with app name or solution name. Give it one name and stick with it.
FIND MATERIALS
————————————
Following need to be replaced:
Group Pictures (Bird category) USE BING
Item Pictures (Birds) – USE BING
App Logo – USE BING AND PAINT
Information about the bird – USE BING
Capabilities and Language – JUST FOLLOW MY GUIDE
GROUP PICTURES
————————————
Navigate to the SampleDataSource.cs and find this code in your sample app, about line 262
Find this text and start to replace it:
Like this:
Run the project to see your results:
Include a picture in the asset folder by dragging and dropping a picture from a folder on your computer to the “Asset” folder in the Solution Explorer
Then refer to that picture in the code like this: (remember to check if its a .jpg or .png)
ITEM PICTURES
————————————
Go about the same way for individual items.
find this code:
Create your first bird, e.g. Vampirebat (always use one word, no spaces or special characters)
Notice here that I have changed ITEM_CONTENT to VAMPIREBAT this word now refers to a string a little further up. It is in this string that you write in depth information about the Vampire Bat. As is now, the code will not run. Find this string now:
Now, add the similar string VAMPIREBAT do not remove the ITEM_CONTENT since all the “empty templates” require this string. (Run code and click on bats)
Notice the repetition,
Further above in the VAMPIREBAT string you see a lot of \n
\n = breaks the line
\n\n = a new line and a space between
{0} = means the content of the first line
INFORMATION ABOUT BIRD
————————————
Find a website with info, e.g. Wikipedia.com, copy a paragraph and paste it here:
Find an other paragraph and adjust the string as in the picture, then run the code.
(Notice that the “About vampire bat” text overlaps the sentence of fact 1.)
This can all be fixed with adding some extra \n like this: (Notice also how i have entered static information into the string)
RUN CODE:
NOW, see the pattern? Start Coding and replace all the categories and content.
FUGLEBOKA:
APP LOGO
————————————
Find a Picture for your app, preferably a white background With a logo in the center and best to use a square picture.
If you want to change the app logo when you start the app go to Assets in Solution Explorer and find the files there. Notice you want to change the colors and content off all these files by opening in Paint and copy pasting from Bing. WARNING: DO NOT CHANGE SIZE, keep the file size to the same e.g. 30×30 or 50×50. If you mess that up, the app wont run. (notice that submission in the store require you to change all but LightGray & DarkGray)
CAPABILITIES AND LANGUAGE
————————————
Before you can submit your app, there are two things to make sure you have entered correctly.
Find this in your solution explorer:
Under language make sure it reflect language you write information in or your app will not pass certification
(No-nb for Norwegian apps)
Select Capabilities and UNCHECK everything or your app will not pass certification
Here at Microsoft Norway we created 3 background Pictures for those of you who want to remember the different keyboard shortcuts and what the various elements on the destktop does.
This reflects the Modern UI.
Check out the Pictures below.
CLICK FOR FULLSCREEN AND DOWNLOAD
Windows 8 shortcuts in 1280×800Windows 8 shortcuts in 1680×1050Windows 8 sthortcuts in 1080p


You must be logged in to post a comment.