Search

Håvard Siegel Haukeberg

Paste life: Ctrl+C -> Ctrl+V

Tag

exchange online

Send your Office 365 users to your branded portal

If you have set up Office 365 and want your users to be automatically redirected to your company branded Office 365 logon portal here is what you need to do

1-dns-settings-for-office-365-www-redirect
Go into your DNS settings at your registrar

You may use the following destination for your www-forwarding in order to get to your portal:

  1. https://outlook.office365.com/owa/?realm=haukeberg.no

  2. https://outlook.com/haukeberg.no

Note that I can turn on URL cloaking, which means the user will allways see my domain (epost.haukeberg.no) in the URL header when he navigates the site. There are some benefits and drawbacks to this

If you can not find your WWW-forwarding settings, use a CNAME post instead. Here is what you need:

4-cname-post-for-365
If you can not find WWW-forwarding

The destination is:

  1. Outlook.office365.com

Result is as follows:

2-standard-login-365-no-branding
Standard Office 365 portal
3-custom-branding-office-365-portal
Already branded Office 365 portal

Adapted from: https://blogs.technet.microsoft.com/kpalmvig/2011/09/15/easy-url-for-office-365-owa/

Intune upgrading or removing the Exchange Connector

So, what would happen if you upgrade from On-premise Exchange Connector or simply remove the Exchange Connector in Intune?

Here in this blog I remove the Exchange Online connector and test what happens on a iPad that is enrolled with Intune.

The user account has Conditional Access on Exchange Online enabled.

img_0005
Conditional Access enabled


Enrolled the device with Intune and checked the Intune Management Portal that the device was registered and active

ipad-activated-and-enabledeas-activated-ipad-in-intune

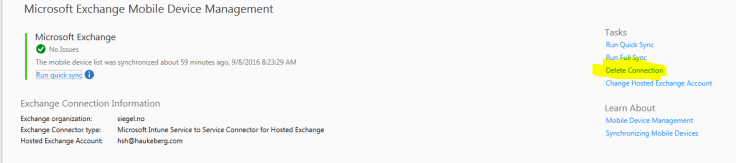
I now delete the Exchange Connection to see what happens on the iPad for the end-user.

microsoft-intune-exchange-online-connector

delete-exchange-connectionno-connection-defined

Connection Deleted.

-> With the connection deleted you can still send and recieve mails from any device without any Conditional Access. As long as you enter the login credentials into any mail app it works.

Removed the device from the company portal app and severed the Intune connection. There is no conditional access so you can still send and recieve mails.

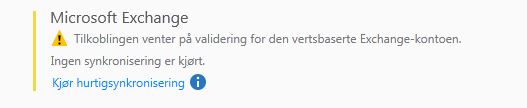
Then add the exchange connector again from http://manage.microsoft.com and now my device should be blocked since Conditional access prevents non-enrolled devices from reading mail.

exchange-connector-sync-status

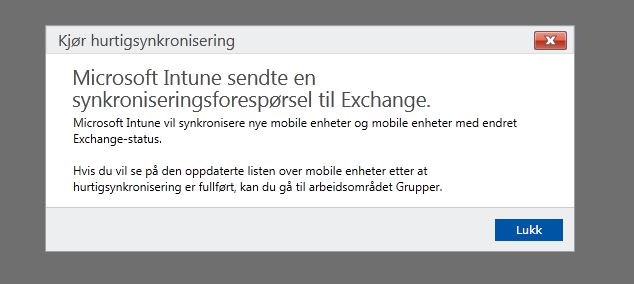
Nothing will happen untill the service has synced with exchange so click the “Run Fast Sync”button

exchange-fast-sync-prompt

A prompt will appear, just close it.

Exchange Conditional Access will now apply to all acounts again. If you have a device which is approved in Intune, no action required. If it is not enrolled in Intune you will have to enroll it.

After some hours when Exchange discovered that this device is not enrolled anymore it will also block mail. This takes about two hours.

Exchange Conditional Access on existing mailbox
Notice the top email asking for renrollment.

Background: The Exchange Connector sends power shell cmdlets to the exchange server. In the Azure AD Microsoft saves the ActiveSync ID with the ID of the Object or Device. This enables our service to block or allow certain devices from reading email. The comprehensive overview of what the connector does can be found here: https://docs.microsoft.com/en-us/intune/deploy-use/intune-on-premises-exchange-connector

Enable Azure MFA on Outlook 2016 with ADAL for Exchange Online

If you have Outlook 2016 or Outlook 2013 and want to use Azure MFA but you do not want to use Application Passwords there are one thing you need to do.

First;

ADAL for Exchange Online is Off by default turn it on here: How to turn on ADAL for Exchange Online


  1. Allow scripting

    • Set-ExecutionPolicy RemoteSigned
  2. Run Windows Powershell and Connect to Office 365.

    • $UserCredential = Get-Credential
    • $Session = New-PSSession -ConfigurationName Microsoft.Exchange -ConnectionUri https://outlook.office365.com/powershell-liveid/ -Credential
    • $UserCredential -Authentication Basic -AllowRedirection
    • Import-PSSession $Session
  3. Check if ADAL is on

    • Get-OrganizationConfig | fl *Oauth*
  4. If ADAL is off, here is how to enable it

    • Set-OrganizationConfig -OAuth2ClientProfileEnabled:$true
  5. Close Your session

    • Remove-PSSession $Session
 Now, for me I had to wait 48 hours for this to work. I also installed a fresh Version of Office 2016 Click to Run from Office 365

Second;

Enable Azure MFA for your user in http://portal.office.com

Click here to see: This is how Outlook Click to Run behaves with Azure MFA turned on

Thanks to MS Exchange Org for some great tutorials.
http://www.msexchange.org/articles-tutorials/office-365/exchange-online/exchange-online-identity-models-authentication-demystified-part7.html


Configuring Conditional Access to Exchange Online (365) with Intune

You can configure Microsoft Intune to block devices that do not comply with a “standard” access to Office 365 Exchange Online email.

Here is how:

  1. http://manage.microsoft.com in a silverlight browser.
  2. Create a Compliance Policy
  3. Policy->Compliance Policy->Create New
compliance policy
I will demand a password of minimum 6 digits and 1 minutes before screenlock.
Setting the Conditional Access and blocking Exchange Active Sync
  1. Policy->Conditional Acces->Exchange Online Policy
  2. Click following:
    • Activate Policy for Conditional Access
    • Select Specific Platforms
    • Check iOS (my rules will now only apply here, rest can read email.
    • Check: Require Compliance for Mobile Device
    • Select “Block access to e-mail for devices not supported by Intune”
    • Select “All users”
    • Select “No exception users”

The iOS users will now have to enroll in order to read email and when they do they need to set a 6 digit password.

Caution with using Active Sync only:

  1. If the user has allready configured email, he might not be blocked.
  2. If the user has been associated with that device earlier, he might not be blocked.

Enrollment procedure:

  1. Enter Your email in the native mail client by going to settings
  2. You recive an email with instructions on how to get access to your mail.
Follow that instruction.


Blog at WordPress.com.

Up ↑

%d bloggers like this: